Cuisinart DGB-550BKP1. Manual. Review.
Cuisinart DGB-550BKP1 Grind & Brew Automatic Coffeemaker
IMPORTANT SAFEGUARDS Cuisinart DGB-550BKP1
When using electrical appliances, basic safety precautions should always be followed to reduce the risk of fire, electric shock and/or injury to persons, including the following
1. READ ALL INSTRUCTIONS.
2. Do not touch hot surfaces. Use handles and knobs.
3. To protect against electric shock, do not place cord, plug, or base unit in water or other liquids.
4. This appliance should not be used by or near children or individuals with certain disabilities.
5. Always unplug from outlet when not in use and before cleaning. Allow to cool before putting on or taking off parts and before cleaning the appliance.
6. Do not operate any appliance with a damaged cord or plug or after the appliance malfunctions or has been dropped or damaged in any manner. Return appliance to the nearest Cuisinart Repair Center for examination, repair, and electrical or mechanical adjustment.
7. The use of accessory attachments not recommended by Cuisinart may cause injuries.
8. Do not use outdoors.
9. Do not let cord hang over edge of table or counter, or touch hot surface.
10. Do not place on or near a hot gas or electric burner, or in a heated oven.
11. Always fill water reservoir first, then plug cord into the wall outlet. To disconnect, push the Off button, then remove plug from wall outlet.
12. Do not use appliance for other than intended use.
13. Snap lid securely onto carafe before serving any beverages.
14. Scalding may occur if the lid is removed during the brewing cycle.
15. The glass carafe is designed for use with these appliances only. It must never be used on the range top.
16. Do not set a hot carafe on a wet or cold surface.
17. Do not use a cracked carafe or a carafe having a loose or weakened handle.
18. Do not clean carafe or warming plate with cleansers, steel wool pads, or other abrasive materials.
19. WARNING: TO REDUCE THE RISK OF FIRE OR ELECTRIC SHOCK, DO NOT REMOVE THE BASE PANEL. NO USER SERVICEABLE PARTS ARE INSIDE. REPAIR SHOULD BE DONE ONLY BY AUTHORIZED PERSONNEL.
20. Avoid contact with moving parts.
21. Check grinder basket for presence of foreign objects before using.
22. Use the coffee grinder to grind roasted coffee beans only. Grinding other substances, such as nuts, spices or unroasted beans may dull the blade and cause poor grinding or injury.
23. Do not place cloth or otherwise restrict airflow beneath coffeemaker.
24. Use only the Cuisinart Gold Tone Commercial Style Filter or standard #4 basket paper filter with this unit. OTHER GOLD TONE PERMANENT FILTERS MAY CAUSE THE COFFEEMAKER TO OVERFLOW.
25.Do not operate your appliance in an appliance garage or under a wall cabinet. When storing in an appliance garage always unplug the unit from the electrical outlet. Not doing so could create a risk of fire, especially if the appliance touches the walls of the garage or the door touches the unit as it closes.
SAVE THESE INSTRUCTIONS
FOR HOUSEHOLD USE ONLY
WARNING: RISK OF FIRE OR ELECTRIC SHOCK
 The lightning flash with arrowhead symbol within an equilateral triangle is intended to alert the user to the presence of uninsulated dangerous voltage within the product’s enclosure that may be of sufficient magnitude to constitute a risk of fire or electric shock to persons.
 The exclamation point within an equilateral triangle is intended to alert the user to the presence of important operating and maintenance (servicing) instructions in the literature accompanying the appliance.
SPECIAL CORD SET INSTRUCTIONS
A short power-supply cord is provided to reduce the risks resulting from becoming entangled in or tripping over a longer cord. Longer extension cords are available and may be used if care is exercised in their use. If a long extension cord is used, the marked electrical rating of the extension cord must be at least as great as the electrical rating of the appliance, and the longer cord should be arranged so that it will not drape over the countertop or tabletop where it can be pulled on by children or tripped over.
NOTICE
This appliance has a polarized plug (one blade is wider than the other). To reduce the risk of electric shock, this plug will fit into a polarized outlet only one way. If the plug does not fit fully into the outlet, reverse the plug. If it still does not fit, contact a qualified electrician. Do not modify the plug in any way
OPERATING NOTICE
Clogging and backing up of water and/or coffee in the filter basket can occur under any or a combination of any of the following conditions: The use of too finely ground coffee, using two or more paper filters, using the gold tone filter in conjunction with a paper filter or not properly cleaning coffee grounds from the gold tone filter, or allowing coffee grounds to spill over the filter.
Caution: Never open the filter basket during the brewing cycle, even if no water is draining from the filter basket, since extremely hot water/coffee can spill out from the filter basket and cause injury. If water/coffee is not draining from the filter basket during the brewing cycle, unplug the unit and wait 10 minutes before opening and checking the filter basket.
WARNING
RISK OF FIRE OR ELECTRIC SHOCK DO NOT OPEN
WARNING: TO REDUCE THE RISK OF FIRE OR ELECTRIC SHOCK,
DO NOT REMOVE COVER (OR BACK)
NO USER-SERVICEABLE PARTS INSIDE
REPAIR SHOULD BE DONE BY AUTHORIZED SERVICE PERSONNEL ONLY
INTRODUCTION Cuisinart DGB-550BKP1
IMPORTANT UNPACKING INSTRUCTIONS
1. Place the box on a large, sturdy flat surface.
2. Remove the instruction book and any other literature.
3. Turn the box so that the backside of the coffeemaker is down and slide the coffeemaker from the box.
4. After the coffeemaker has been removed, Place the box out of the way and lift off the pulp inserts.
5. Remove cardboard insert from carafe handle.
6. Remove the cardboard insert between the carafe lid and Brew Paus mechanism by sliding it out of the unit.
7. Grasp the carafe by its handle, remove it from the heater plate and remove the polybag.
8. Remove the polybag covering the coffeemaker. We suggest you save all packing materials in the event that future shipping of the machine is needed. Keep all plastic bags away from children.
THE QUEST FOR THE PERFECT CUP OF COFFEE
It is generally agreed that there are four basic elements critical to the perfect cup of coffee:
Element 1: Water
Coffee is 98% water. Often overlooked, the quality of the water is as important as the quality of the coffee. A good rule of thumb is that if your water doesn’t taste good from the tap, it won’t taste any better in your coffee. That’s why Cuisinart has added a water filter to the Grind & Brew™ Coffeemaker. The charcoal water filter removes chlorine, bad tastes and odors, for the purest cup of coffee every time.
Element 2: Coffee
While the bulk of the liquid is water, all of the flavor should be from the coffee. To achieve the same great quality cup of coffee you receive at a coffee bar, you need to use the same quality beans. Buy the beans fresh and whole, only about two weeks’ supply at a time for maximum freshness. Once the coffee bean is broken, its flavor degrades very quickly. That’s why the Grind & Brew grinds your coffee just prior to brewing. If it is not practical to buy small supplies, we recommend you separate larger amounts of beans into one to two week portions immediately after purchase, and freeze them in airtight containers. The best way to maximize freshness is to minimize exposure to air, light and moisture. So, once beans have been removed from the freezer, maintain them in a sealed container at room temperature, since damaging condensation occurs every time the beans are removed from the freezer or refrigerator. Note that some coffee experts advise against freezing dark-roast beans, because freezing can cause the oils to coagulate. Other experts disagree. We suggest you experiment and decide for yourself.
Element 3: Grind
The grind is critical for proper flavor extraction. If the grind is too fine, overextraction and bitterness will result. Too fine a grind may also clog the filter. If grind is too coarse, the water will pass through too quickly and the desired flavors will not be extracted. The Grind & Brew™ is preset for a medium grind, the optimal grind for this type of coffeemaker.
Element 4: Proportion
The Grind & Brew makes up to twelve (12) 5-ounce cups of coffee. Using whole beans:
• We recommend you use 1 scoop (provided; equals 1 tablespoon) of whole beans per cup. For 1 or 2 cups, use 1½ level scoops per cup. Adjust the recipe according to individual taste.
NOTE: THE MAXIMUM CAPACITY FOR WHOLE BEANS IS 14 LEVEL SCOOPS.
DO NOT OVERFILL OR THE GRINDER COULD MALFUNCTION AND/OR THE COFFEEMAKER COULD OVERFLOW.
Using Pre-Ground Coffee
Although it is preferable to use fresh, whole beans, you can make coffee in the Grind & Brew using pre-ground beans.
To do so, turn off the grinder by pressing the Grind Off button before turning on the unit. We suggest that you use 1 level scoop of ground coffee per cup. Adjust the recipe to your taste.
NOTE: The maximum capacity for ground coffee is 16 level scoops, using either a paper or permanent filter. Exceeding this amount may cause overflow.
FEATURES AND BENEFITS Cuisinart DGB-550BKP1
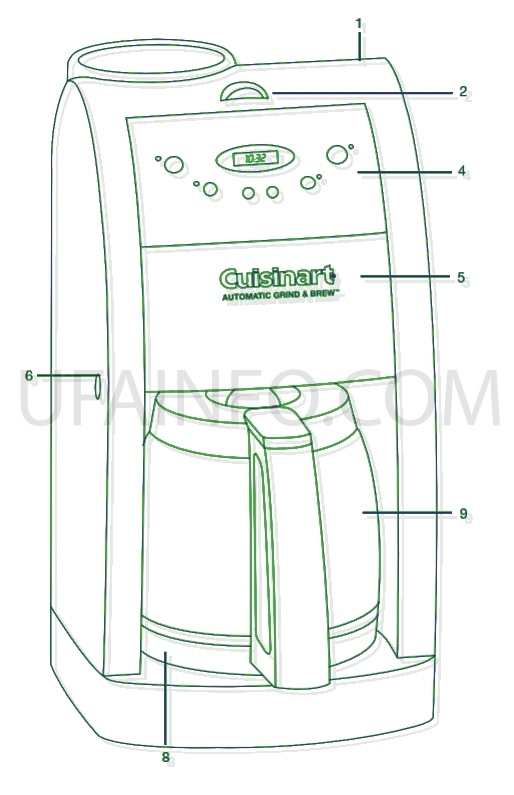
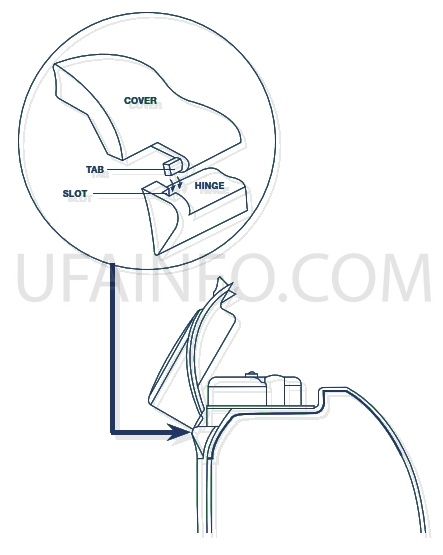
1. Reservoir Cover Flips back for easy filling. Removable for easy cleaning. A Safety Interlock System prevents operation of the unit if the Reservoir Cover is open.
2. Reservoir Cover Release Button 3. Showerhead (not shown) Distributes water evenly over coffee, reducing temperature loss as water passes through grounds.
4. Control Panel See detailed drawing, page 7.
5. Filter Basket Compartment see detailed drawing, page
6. Contains: Filter Basket Filter Basket Cover Cuisinart Gold Tone Commercial Style Filter 6. Filter Basket Door Release Button
7. Brew Pause (not shown) Stops flow of coffee from basket when carafe is removed from heater plate so a cup can be poured in mid-brew, if desired.
8. Heating Plate Scratch resistant with nonstick coating.
9. Carafe The easy-pour, no-drip 12-cup carafe has an ergonomic handle and brewed coffee markings for two to twelve cups.
10. Cord Storage (not shown)
11. Measuring Scoop and Brush (not shown)
12. #4 Basket Paper Filters included (not shown)
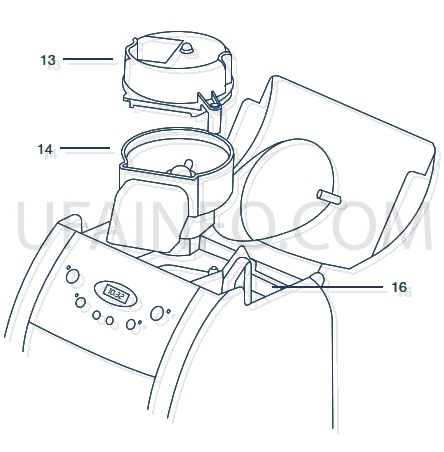
13. Grinder Basket Lid Use the recess on each side of the lid to remove lid for easy addition of beans. Note: Lid must be in place for unit to operate.
14. Grinder Basket
15. Charcoal Water Filter (see page 9) Charcoal water filter eliminates chlorine, bad tastes and odors from tap water.
16. Water Reservoir with Water Level Indicator
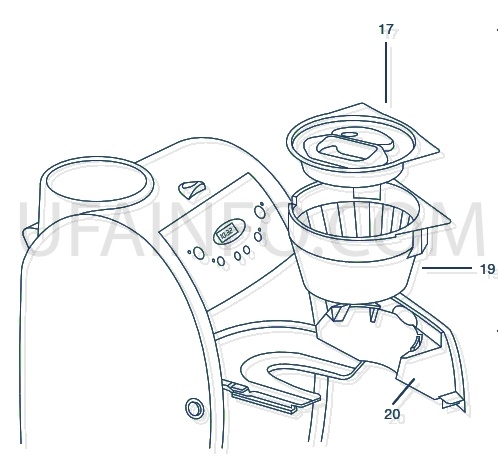
17. Filter Basket Cover To put on or remove, grasp cover in area indicated by arrows. NOTE: COVER MUST BE IN PLACE FOR UNIT TO OPERATE CORRECTLY. Cover becomes hot after coffee is brewed. Use caution when removing cover.
18. Gold Tone Cuisinart Commercial Style Filter (not shown) A note about filters: When using our permanent filter, be sure that the handle is positioned toward the front of the unit. If you do not, the handle may interfere with the flow of coffee into the filter basket. Also note, using our permanent gold-tone filter will allow some fine coffee grounds to fall into the coffee carafe. This will appear as sediment in the carafe.
19. Filter Basket Holds our commercial style permanent filter or paper filter. NOTE: FILTER BASKET MUST BE IN PLACE FOR UNIT TO OPERATE CORRECTLY. Removable for easy cleaning.
20. Filter Basket Door
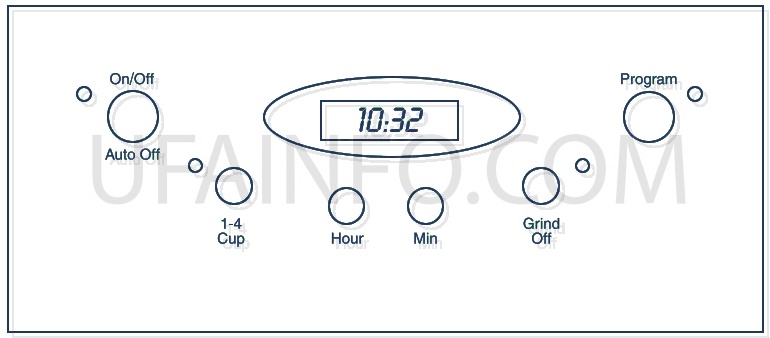
Control Panel
(Detailed programming instructions are on pages 8 and 9)
1. On/Off/Set Auto-Shutoff Switch with LED Indicator
a. Audible Tone (not shown): The Automatic Grind & Brew coffeemaker is equipped with an audible tone which will sound 5 times when the coffee has completed brewing (coffee may continue to stream from the filter for several seconds thereafter).
b. Auto-Shutoff Tone (not shown): Unit will sound twice at end of programmed auto-shutoff period (when unit has shut itself off completely).
2. Low Cups Setting with LED Indicator: Set to “1-4 cup” to improve extraction and flavor when making fewer than 5 cups of coffee.
3. Hours Set/Minutes Set Press and hold either hour or minute button for approximately 2 seconds to enter Time Set Mode.
4. Clock Display Displays time of day, program setting when program button is depressed, or Auto-Shutoff time when On/Off button is depressed.
5. Grind Off with LED Indicator Use to turn off the grinder when using pre-ground coffee.
6. Program Setting with LED Indicator Press to display program setting or to set for programmed brewing.
PROGRAMMING YOUR COFFEEMAKER Cuisinart DGB-550BKP1
1. Setting the Clock When the coffeemaker is plugged in, 12:00 will appear until you set the time.
Entering Time Set Mode
To set the time, hold down either the Hours or Minutes button until the clock begins flashing (about 2 seconds). You are now in the Time Set mode and can operate either button to achieve the desired setting. The buttons can be held down to scroll through the digits, or pressed and released lightly to advance one digit at a time. When scrolling, the numbers will advance slowly at first and then speed up to the rate of about three per second. When the number displayed approaches the desired setting, release the button and press repeatedly to advance one digit at a time. Be careful to make sure that “PM” is on if a PM time is desired.
Exiting Time Set Mode
The Time Set mode can be exited in one of two ways:
1. Press any button besides the Hours or Minutes button. This will exit the Time Set and activate the selected function.
2. Do nothing. If neither the Hours nor Min button is pressed for a period of five seconds, the Time Set mode will be exited.
2. Setting the Program Time When you press the Program Set button, it displays the current program time (default time 12:00 p.m.).
Entering Set Program Time Mode
Press and hold the Program button (about 2 seconds) until the green light and LCD display begin to flash. This signals that you have entered the Set Program Time mode. The desired time can be set by pressing the Hours and Min buttons to scroll forward through the digits. Pressing and holding either button will allow you to scroll continuously, slowly at first, and then to accelerate to the rate of about three digits per second. As the desired time setting approaches, release the button and then press repeatedly to advance one digit at a time. The coffeemaker will start to brew at the programmed time. The Program mode cannot be entered if the coffeemaker is in its brew or keep warm cycle.
Exiting Set Program Time Mode Set Program Time may be exited in any of three ways:
1. Press the Program button. This will cause the coffeemaker to revert to its previous state. If it was Off, it will return to the Off position. If Programmed, it will revert to this state, and so on. This is a safety feature.
2. Press any other button (except Hours or Min). Set Program Time will be exited and the function of that button will be executed. 3. Do nothing. If neither the Hours nor Min button is pressed for a period of five seconds, the Set Program Time mode will be exited and the programmed setting will be in effect.
3. Programming
Automatic Shutoff Time
The Automatic Shutoff Time can be programmed anywhere from immediate shutoff after completion of the brew cycle up to four hours. When the coffeemaker shuts itself off, two tones will sound. Two hours is the default time. The 0:00 setting shuts the unit off immediately after brewing is complete. To check the current setting, press and hold the On/Off button and the Automatic Shutoff Time will be displayed.
To change the preset time, press and hold the On/Off button until the red power light and LCD display begin to flash. This signals that you have entered the Set Automatic Shutoff mode.
Press the Hours and Min buttons to scroll forward through the digits until desired time appears. The first setting which appears is preset at 2:00. Pressing and holding either button will allow you to scroll continuously, slowly at first, and then to accelerate to the rate of about three digits per second.
As the desired time setting approaches, release the button and then press repeatedly to advance one digit at a time. The Automatic Shutoff Time (ASO) may be programmed either before or during coffee brewing. You may also re-program the ASO time when brewing has been completed. If you do so, the Grind & Brew will automatically account for any time that has already elapsed after brewing. For example, if you set the ASO for 40 minutes and 25 minutes have already elapsed, the Grind & Brew will shut off automatically after 15 minutes (40 minutes minus the 25 elapsed equals 15 minutes).
Turning off Grind Function
To turn off the grinding function, press the Grind Off button. An amber LED will be illuminated. Then press the On button.
CHANGING THE WATER FILTER
a. Remove the filter from polybag and soak in cold tap water for 15 minutes.
b. Remove the water filter holder from the coffeemaker by lifting it out of the reservoir area with your thumb and forefinger.
c. Grasp stem in one hand. Using thumb of other hand, gently press down and pull toward you. Compartment will flip open.
d. Place the filter in the holder and close the water filter holder; you will hear a snap indicating it is in place.
NOTE: Caution must be used when inserting the charcoal filter. Improper placement in the holder can cause tearing of the filter skin.
e. Hold the filter under cold running tap water for 10 seconds to flush. You should place the hole openings in the side of the unit directly under the water stream.
f. Allow the filter to drain completely.
g. Replace the water filter holder in the reservoir area of the coffeemaker, pushing it all the way down to the base of the unit, along the reservoir wall.
Note: We recommend changing the water filter every 60 days or 60 uses, more often if you have hard water. Replacement water filters can be purchased in stores or by calling customer service or through the Cuisinart web site.
MAKING COFFEE
Before you make the first pot of coffee in your new Cuisinart® Grind & Brew Automatic coffeemaker, we recommend operating the coffeemaker once, using only water and a paper filter. This will remove any dust or residues which remain in the system from the manufacturing process.
1. Fill the Water Reservoir Open the reservoir lid by pushing the release button and lifting up. Pour the desired amount of water in the reservoir using the step water indicator located at the rear of the reservoir.
2. Add Beans Lift the grinder basket lid, using the recess on either side. Fill the basket with the desired quantity of beans. Use 1 level scoop of whole beans per cup. For 1 to 4 cups, use 1½ level scoops per cup. Maximum capacity for whole beans is 14 level scoops. Do not overfill or the 12 grinder could malfunction and/or the coffeemaker may overflow. This is our suggested recipe. Adjust the recipe to taste.
3. Open Filter Door
Place a #4 basket paper filter or Cuisinart’s commercial style permanent filter in the basket.
Note: When using the Cuisinart filter, be sure that the filter handle is facing away from the grinder basket. If you do not do so, the handle may interfere with the flow of ground coffee into the filter basket. Also note: a permanent filter may allow some ground coffee to flow into carafe. The filter basket will help to keep the filter open, but when using a paper filter, be sure that the filter is completely open while touching the side walls and bottom of the basket.
Place filter basket lid in place. Close filter door.
4. Close the Reservoir Lid Press down to lock. The Grind & Brew™ Automatic coffeemaker is equipped with a Safety Interlock System. Because grinder blades spin during operation, the Grind & Brew™ coffeemaker will not operate if the cover of the unit is open or the grinder cover is left out. If you try to turn the unit on with the cover open, the unit will beep continuously until the missing parts are installed and you close the lid. The unit will also beep if you open the lid during the brewing process. The grinder will stop grinding or, if brewing, the brewing will stop. Once the missing parts are installed and the cover is closed, the beeping stops. The brewing process can be restarted by pressing the On button. Restarting the process will not affect coffee results. If you do not want the grinder to come on again, press the Grind Off button before pressing the On button. Once the lid is closed, the beeping will stop, and the grind and brew process will start again from the beginning.
5. Before Brewing Coffee Make sure you have replaced the glass carafe in its position on the warming plate and have placed a filter in the filter basket. Plug the cord into an electrical outlet. 12:00 will appear until you set the time. This will not interfere with the operation of the coffeemaker. To set clock, see the Programming Your Coffeemaker section, page 8. Check to see that the Automatic-Off Time is as you desire. For information on these features see Programming Your Coffeemaker on page 8.
6. Power Unit
a) Immediate grinding and brewing: Press the On button. The indicator will light and the process will begin.
b) Programmed brewing: Press the Program button. The indicator will light and the display will show the programmed time for as long as the button is depressed. The display reverts back to time of day once the button is released. To set the programmed time, see Programming Your Coffeemaker on page 8.
7. Select Cups Setting The 1-4 cup setting button is used when you make small amounts of coffee. Normal coffeemakers will produce a colder batch of coffee when smaller amounts are made, because the heater doesn't have enough time to properly warm up to heat a small amount. The 1-4 setting basically double heats the water, making your smaller amount as piping hot as a full pot would be. To use: When making a smaller amount, press the 1-4 button on the control panel after turning on the unit. The indicator light will illuminate. Note that the 1-4 button can be set at any time.
8. During and After Brewing The Brew Pause feature allows you to remove the carafe from the heater during mid-brew. The brewing process does not stop during this period; only the flow of coffee from the basket stops. Do not remove the carafe for longer than 30 seconds or the coffee may overflow the basket. While we offer this feature, we do not recommend that you pour coffee before the cycle has reached completion, since the coffee brewed at the beginning of the cycle has a flavor profile which is very different from the coffee made at the end of the cycle. Removing a cup during the brewing cycle 13 will alter the flavor of the finished pot. When the brewing cycle is completed, five beeps will sound. Coffee will continue to stream from the filter for several seconds. Once the coffee has finished brewing, stir it before serving to blend the flavors. The coffee at the bottom of the carafe will be somewhat stronger than the coffee at the top. After brewing, the heater plate will keep the coffee at about 180°-185°F. We recommend transferring the coffee to a thermal carafe preheated with hot water, if the coffee is not going to be drunk within 20 minutes.
TO MAKE COFFEE WITH PRE-GROUND BEANS Cuisinart DGB-550BKP1
Follow step #1 from Making Coffee section on page 9, then continue as follows:
2. Open filter door. Add ground coffee to our permanent or #4 basket paper filter. Our recipe suggestion: Use 1 level scoop (1 tablespoon) of ground coffee per cup. Adjust the recipe according to your individual taste.
NOTE: The maximum capacity for ground coffee is 16 level scoops, using either a paper or permanent filter. Exceeding that amount may cause overflow if the coffee is too finely ground.
3. Place filter basket lid in place. Close filter door.
4. Follow instructions 4 through 8 from the Making Coffee section, page 10.
5. Press the Grind Off button. When this function is activated, an amber LED will be illuminated. Then press the On button.
CLEANING AND MAINTENANCE Cuisinart DGB-550BKP1
COMPLETELY CLEAN AND DRY ALL PARTS AFTER EVERY USE.
Always turn coffeemaker Off and remove the plug from the electrical outlet before cleaning. Open the reservoir lid*. Remove the grinder basket lid by using the recessed area on each side of the lid. Then remove grinder basket.
Open filter basket door. Remove filter basket cover, and filter basket.
The grinder basket, grinder basket lid, filter basket and filter basket cover can be washed in warm soapy water and rinsed thoroughly, or cleaned in the upper rack of the dishwasher. Dry all parts after every use.
Do not put any water in the unit once the grinder basket has been removed. Wipe the area under the grinder basket with a damp cloth. If water gets into the grinder motor, the motor may become damaged and may malfunction.
Once clean, reverse the above steps.
Remove the carafe from the warming plate. Discard any remaining coffee. The carafe and lid can be washed in warm soapy water and rinsed thoroughly, or placed in a dishwasher. The carafe and carafe lid should be placed on the upper rack only.
Do not use scouring agents or harsh cleansers on any part of the coffeemaker.
Never immerse base unit in water or other liquid. To clean base, simply wipe with a clean, damp cloth and dry before storing. Wipe warming plate with a clean, damp cloth.
Never use rough, abrasive materials or cleansers to clean the warming plate. Do not dry the inside of the water reservoir with a cloth, as lint may remain.
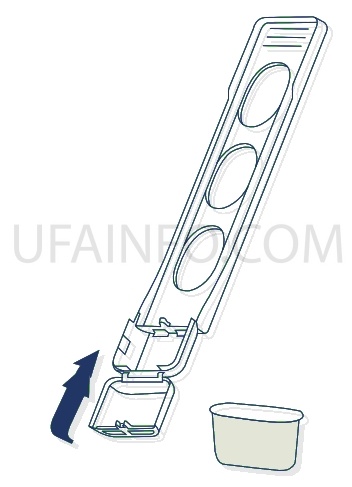
*Note: Reservoir lid can also be removed for easy cleaning. Open the lid 60˚ and gently pull toward you. To replace, reverse steps, see diagram.
Maintenance: Any other servicing should be performed by an authorized service representative.
DECALCIFICATION Cuisinart DGB-550BKP1
Decalcification refers to removing the calcium deposits which form over time on the metal parts of the coffeemaker.
For best performance from your coffeemaker, decalcify the base unit from time to time. The frequency depends upon the hardness of your tap water and how often you use the coffeemaker.
To clean, fill the water reservoir to capacity with a mixture of ¹⁄³ white vinegar and ²/³ water. Turn the coffeemaker on by pressing the On button. One cycle should be sufficient to adequately clean the coffeemaker. When the cycle is completed and the five beeps sound, turn coffeemaker off. Repeat operation this time using fresh cold water
WARRANTY Cuisinart DGB-550BKP1
LIMITED THREE-YEAR WARRANTY
This warranty is available to consumers only. You are a consumer if you own a Cuisinart Grind & Brew Automatic Coffeemaker that was purchased at retail for personal, family or household use. Except as otherwise required under applicable law, this warranty is not available to retailers or other commercial purchasers or owners. We warrant that your Cuisinart Grind & Brew Automatic Coffeemaker will be free of defects in materials and workmanship under normal home use for three years from the date of original purchase.
We recommend that you visit our website, for a fast, efficient way to complete your product registration. However, product registration does not eliminate the need for the consumer to maintain the original proof of purchase in order to obtain the warranty benefits. In the event that you do not have proof of purchase date, the purchase date for purposes of this warranty will be the date of manufacture.
Your Cuisinart Grind & Brew Automatic Coffeemaker has been manufactured to the strictest specifications and has been designed for use only in 120-volt outlets and only with authorized accessories and replacement parts. This warranty expressly excludes any defects or damages caused by attempted use of this unit with a converter, as well as use with accessories, replacement parts or repair service other than those authorized by Cuisinart. This warranty does not cover any damage caused by accident, misuse, shipment or other than ordinary household use. This warranty excludes all incidental or consequential damages. Some states do not allow the exclusion or limitation of these damages, so these exclusions may not apply to you. You may also have other rights, which vary from state to state.
Read also
Mr. Coffee Iced Coffee Maker BVMC-ICM (2128308). Manual. Review.
Coffee machine hamilton beach. Manual. Review.
User manual Philips 5400 Series LatteGo EP5444/90 COFFEE PREPARATION...