Coffee Machines Barista Express Impress. Part 2
Coffee Machines Barista Express Impress. Part 2
EXTRACTION GUIDE. Coffee Machines Barista Express Impress
| ~ | GRIND | GRIND DOSE | SHOT TIME |
| OVER EXTRACTED BITTER • ASTRINGENT | TOO FINE | TOO MUCH | OVER 35 SEC |
| BALANCED | OPTIMUM | 8-11g (1 CUP) 16-19g (2 CUP) | 25-30 SEC |
| R UNDER EXTRACTED UNDERDEVELOPED • SOUR | TOO COARSE | TOO LITTLE | UNDER 20 SEC |
MANUAL PRE-INFUSION
• Press and hold the 1 CUP or 2 CUP button for the desired pre-infusion time.

• Release the button to start the extraction.
• Press the 1 CUP or 2 CUP button again to stop the extraction.
Pressing any button during extraction will stop extraction and the machine will return to standby mode.
PROGRAMMING SHOT VOLUME
• Press and hold both the 1 CUP and 2 CUP buttons for 3 seconds, the buttons will illuminate and flash.

To set the 1 CUP volume:
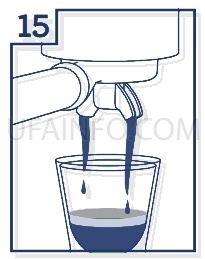
• Press the 1 CUP button to start the extraction.
• Press the 1 CUP button again to stop the extraction. The modified volume will be saved.
To set the 2 CUP volume, follow the above steps but select the 2 CUP button to start and stop the extraction.
USING HOT WATER
The machine has a dedicated hot water outlet.
• Turn the dial on the right, from STANDBY to  HOT WATER.

• Turn the dial back to STANDBY to stop hot water flow.

• Maximum flow out of hot water volume is 8fl.oz (240ml).
Cup temperature is approximately 194°F (90°C). Be careful in handling hot beverages.
TEXTURING MILK
There are two phases to texturing milk, stretching, and heating. These two operations should blend into one with the goal being silky smooth textured milk at the correct temperature.
• Start with fresh cold milk of choice.
• Fill the milk jug between the min and max level.
• Position the steam tip over the drip tray and turn the dial from STANDBY to STEAM and wait until the steam is flowing strongly.
• Turn the steam dial to the STANDBY position to pause the steam, then within 8 seconds, insert steam wand tip into milk jug and turn dial back to STEAM position.
• Insert the steam tip 1-2cm below the surface of the milk close to the right-hand side of the jug at the 3 o’clock position.
• Keep the tip just under the surface of the milk until the milk is spinning clockwise, producing a vortex (whirlpool effect).
• With the milk spinning, slowly lower the jug. This will bring the steam tip to the surface of the milk and start to introduce air into the milk. You may have to gently break the surface of the milk with the tip to get the milk spinning fast enough.
• Keep the tip at or slightly below the surface, continuing to maintain the vortex. Texture the milk until sufficient volume is obtained.
• Lower the tip beneath the surface but keep the vortex of milk spinning. The milk is at the correct temperature 140-149°F (60-65°C) when the jug is hot to comfortably touch.
• Move the steam dial to the STANDBY position before taking the tip out of the milk.
• Set the jug to one side, turn dial to STEAM to purge out any residual milk from the steam wand and wipe steam wand with a damp cloth.
• Tap the jug on the bench to collapse any bubbles.
• Swirl the jug to polish and re-integrate the texture.
• Pour milk directly into the espresso.
• The key is to work quickly, before the milk begins to separate.
Pressurized steam can still be released, even after machine has been switched off. Children must always be supervised.
Adjusting Water Temperature
Different beans may require different water temperatures to extract their optimum flavor. The temperature can be adjusted +/- 4°F (2°C) in 2°F (1°C) increments from the default setting:
1. Turn the machine to OFF.
2. Press and hold ‘Filter’, 1 CUP and 2 CUP then press and hold the POWER button.
3. The machine will beep once and display the current temperature.
4. Press one of the below buttons within 5 seconds:
• Increase 2°F (1°C) – 2 CUP
• Increase 4°F (2°C) – POWER
• Decrease 2°F (1°C) – Manual Dose
• Decrease 4°F (2°C) – Dose The machine will beep twice to confirm the change and return to standby mode.
5. Return to default temperature – press 1 CUP button.
ADJUSTING CONICAL BURRS. Coffee Machines Barista Express Impress.
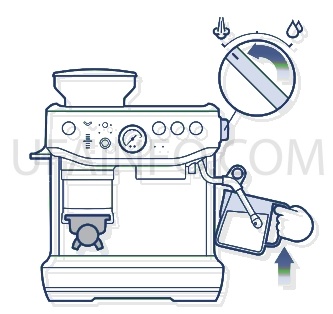
Some types of coffee may require a wider grind range to achieve an ideal extraction or brew. A feature of your Barista Express Impress is the ability to extend this range with an adjustable upper burr. We recommend making only one adjustment at a time.
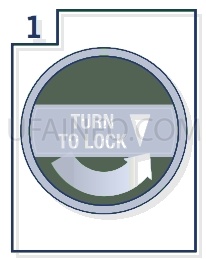
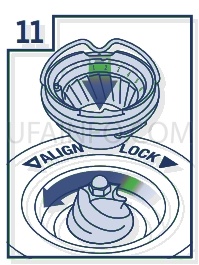
Unlock hopper
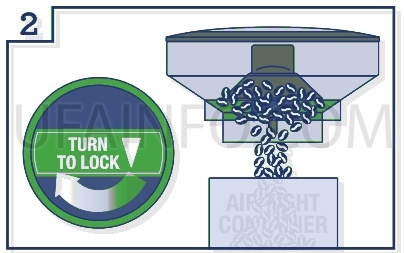
Hold hopper over container & turn dial to release beans into container
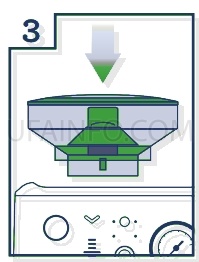
Align hopper into position

Run grinder until empty
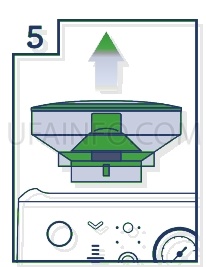
Remove hopper
Remove upper burr
Remove wire handle from both sides of the burr
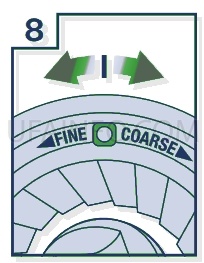
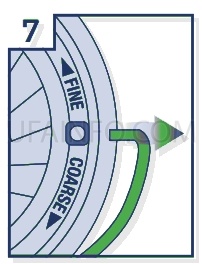
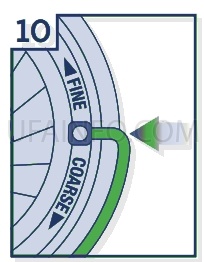
Move adjustable top burr, 1 number, coarser or finer
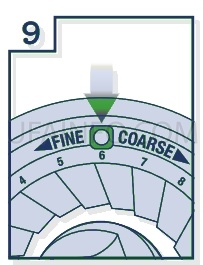
Align the number with the handle opening
Insert wire handle from both sides of the burr
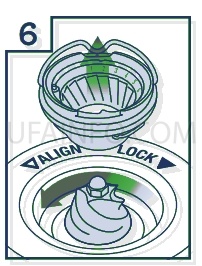
Push upper burr firmly into position
Lock upper burr
Align hopper into position
Lock hopper
Check your extraction
RESET DEFAULT SETTINGS. Coffee Machines Barista Express Impress
Reset Auto Dose Time Resetting the auto dose time is recommended if there is a significant change to the grind size or there is an accidental double dose into the portafilter.
The machine must be on STANDBY mode.
• Press and hold ‘Manual Dose’ button and ‘Filter’ button for 3 seconds to reset grind time to factory settings.
• The machine will confirm the reset when the control panel lights for filter, grind mode and dial will flash 3 times with beeping sounds.
• The machine will return to STANDBY mode. Reset Extraction Time The machine must be on STANDBY mode.
• Press and hold the ‘Filter’ and 1 CUP and 2 CUP buttons for 3 seconds.
• The machine will beep 3 times.
• The machine will then go into ready mode.
ALERTS
No Hopper Warning
The ‘Filter’ lights flash between single and double basket size, the hopper is not attached correctly. Check the hopper and ensure the bean hopper is inserted correctly and locked in place.
Low Coffee Beans Warning
The ‘Dose’ button and the ‘Dose Level’ lights will flash two red LEDS and will sound 3 beeps. Add coffee beans to the hopper.
Tamp Lever Not at Home Position
The machine beeps 3 times and pauses dose cycle. Return the lever to the up or home position and press ‘Dose’ button to continue.
Care & Cleaning. Coffee Machines Barista Express Impress
REPLACING THE WATER FILTER IN THE WATER TANK
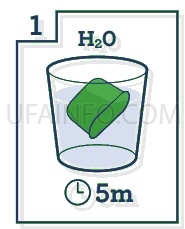
Soak water filter for 5 mins

Rinse water filter
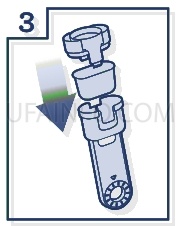
Place filter into filter holder
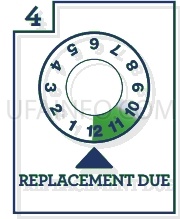
Set date 3 months ahead
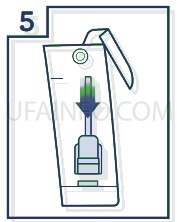
Install filter in water tank

Insert & lock water tank
The provided water filter helps reduce the risk of scale build-up in and on many of the inner functioning components. Replacing the water filter every three months will reduce the need to descale the machine. If you live in a hard water area, it is recommended to change the water filter more frequently
After regular use, hard water can cause mineral build up in and on many of the inner functioning components, reducing the brewing flow, brewing temperature, power of the machine, and taste of the espresso.
• Remove the filter from the plastic bag, and soak in a cup of water for 5 minutes.
• Rinse the filter under cold running water for 5 seconds.
• Insert the filter into the filter holder.
• Set the date dial 3 months ahead.
• To install, push down the filter to lock into place.
For replacement of water filters contact Breville Customer Service Centre or visit our website at
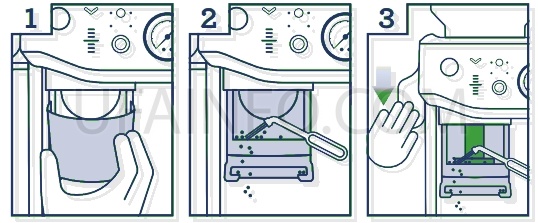
CLEANING CYCLE. Coffee Machines Barista Express Impress
This is a back-flushing cycle and separate from descaling.
The CLEAN / DESCALE light will flash when a cleaning cycle is required.
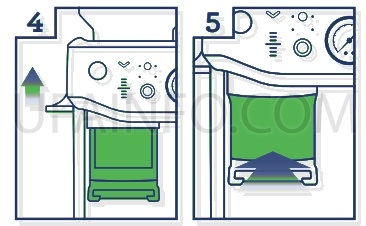
1. Insert the 1 CUP filter basket into the portafilter, followed by the supplied cleaning disc, followed by one cleaning tablet.
2. Lock the portafilter into the group head and place a large container beneath the portafilter spouts.
3. Ensure the water tank is filled with cold water and the drip tray is empty.
4. Press the POWER button to switch the machine off.
5. Press and hold 1 CUP, 2 CUP and the POWER buttons for 3 seconds

6. The cleaning cycle will commence and last for approximately 5 minutes. During this time, water will intermittently flush into the portafilter to dissolve the cleaning tablet and flush back into the group head.
No water should come through the portafilter.
7. Remove the portafilter and ensure the tablet has completely dissolved. If the tablet has not dissolved; repeat from step 4 of the cleaning cycle until the tablet is dissolved.
8. Once the tablet has completely dissolved, remove the cleaning disc, reinsert the portafilter and press the 2 CUP button to rinse the brew head. It is recommended to place a container under the portafilter spout to avoid water splashing onto the machine. Once complete, make sure to wipe off any splashes with a soft dry cloth.
DESCALING. Coffee Machines Barista Express Impress.
• Ensure that the water filter is removed from the water tank before adding the descaling powder when descaling the machine.
• While the cleaning cycle is important for keeping the brew head clean from coffee oils; the descaling cycle is essential to ensure that the machine is kept clean on the inside and free from mineral build-up.
• Do not use bottled water when descaling. Most bottled water may contain dissolved solids that can leave deposits inside the machine.
The CLEAN / DESCALE light will illuminate solid when descaling is required
1. Fully dissolve one sachet of Breville descaling powder into 4 cups (34fl.oz | 1L) of water then fill the water tank (start the process after fully dissolving the powder).
2. Ensure the machine is OFF; then press and hold the 2 CUP and POWER buttons simultaneously for 5 seconds to enter the descale mode.

The unit will heat up as part of commencing the descaling action, during the heating process, the POWER and 2 CUP buttons should flash continuously.
The machine will indicate it is ready for descaling when the POWER button, 2 CUP button, CLEAN / DESCALE indicator and HOT WATER / STEAM indicator are all illuminated solid.
Descaling the coffee component
3. Press the 2 CUP button to start the descaling for the coffee component of the machine. Descaling coffee component takes approximately 25 seconds. The 2 CUP button should flash continuously and remain constant once the descaling process has finished. To terminate the descaling within 25 seconds, press the 2 CUP button again.
Extraction will run for 25 seconds or the user press the 2 CUP button. The unit will confirm coffee component descale cycle with a beep and the 2 CUP light turns solid.
Descale the steam and hot water components
Descaling steam and hot water take approximately 13 seconds and 8 seconds respectively. Descaling can be terminated prematurely by turning the steam dial to STANDBY.
4. Descale Steam component by turning the steam dial RIGHT towards the  STEAM icon.
5. Descale Hot water component by turning the steam dial to the LEFT towards the  HOT WATER icon.
Repeat processes to complete descaling
After the above processes about half (17fl.oz | 0.5L) of the descale solution should be left in the water tank.
6. Repeat steps 3-5 above to complete the descaling process to empty the solution in the tank.
Descaling Solution Rinse
7. After descaling, remove the water tank and rinse thoroughly then refill with fresh cold water to the maximum capacity (68fl.oz | 2L) and repeat steps 4-6 to further cleanse the machine of any residue of the cleaning solution thoroughly.
8. Press POWER button to quit the descaling process. This will be indicated by the LED lights switching off.
The machine turns off automatically if there is no action for 5 minutes in descaling mode. To resume descaling start from step 2.
CLEANING CONICAL BURRS. Coffee Machines Barista Express Impress.
Regular cleaning helps the burrs achieve consistent grinding results.

1 Unlock hopper
2 Empty hopper
3 Replace hopper
4 Lock hopper
5 Run grinder until empty
6 Unlock hopper
7 Remove hopper

8 Unlock top burr
9 Remove top burr
10 Clean top burr with brush
11 Clean lower burr with brush
12 Remove tamp cover
13 Clean the chute with brush
14 Replace tamp cover
ADVANCED CLEANING FOR THE CONICAL BURR GRINDER
This step is only required if there is a blockage between the grinding burrs and the grinder outlet.

1 Remove hopper
2 Set GRIND SIZE to 1 (finest)
3 Use 10mm socket. Rotate clockwise to loosen the nut only
4 Set GRIND SIZE to 25 (coarsest)
5 Unlock & remove top burr
6 Remove nut, spring & flat washer. Carefully remove lower burr.
7 Remove grind fan & washers using long-nose pliers

8 Unblock the grinds exit chute using the brush or a pipe cleaner
9 Remove tamp cover
10 Clean the chute with brush
11 Replace tamp cover
12 Insert washers & grind fan using long-nose pliers
13 Insert lower burr (drive pin & cavity to align). Insert flat washer & spring washer.
14 Rotate counter-clockwise to tighten nut

15 Insert & lock top burr
16 Set GRIND SIZE to 16
17 Replace hopper
18 Lock hopper
Care should be taken as the grinder burrs are extremely sharp.
CLEANING THE TAMP SYSTEM. Coffee Machines Barista Express Impress.
1 Remove tamp cover
2 Clean the chute with brush
3 Push down lever
4 Release lever
5 Replace tamp cover
• Remove the tamp cover.
• Brush clean the tamp face and cradle from any dust or grinds.
• Push down and hold the lever down, using the tamp cleaning brush, dust off grind residues in and around the tamp.
• Slowly release the lever back up making sure the cleaning brush is clear and out of the tamp system area.
CLEANING THE STEAM WAND
• The steam wand should always be cleaned after texturing milk. Wipe the steam wand with a damp cloth. Then with the steam wand tip directed over the drip tray, briefly set the STEAM / HOT WATER dial to the STEAM position. This will clear any remaining milk from inside the steam wand.
• If any of the holes in the tip of the steam wand become blocked, ensure the STEAM / HOT WATER dial is in the STANDBY position. Press the POWER button to switch the machine off and allow to cool. Use the pin on the end of the provided cleaning tool to unblock the hole(s).
• If the steam wand remains blocked, remove the tip using the integrated spanner in the cleaning tool and soak in hot water. Use the pin on the end of the provided cleaning tool to unblock the hole(s) before re-attaching to the steam wand.
CLEANING THE FILTER BASKETS AND PORTAFILTER
• The filter baskets and portafilter should be rinsed under hot water immediately after use to remove all residual coffee oils.
• If any of the holes in the filter basket become blocked, use the pin on the end of the provided cleaning tool to unblock the hole(s).
• If the hole(s) remain blocked, dissolve a cleaning tablet in hot water and soak filter basket and portafilter in solution for approximately 20 minutes.
• Rinse thoroughly.
CLEANING THE SHOWER SCREEN
• The group head interior and shower screen should be wiped with a damp cloth to remove any ground coffee particles.
• Periodically purge the machine. Place an empty filter basket and portafilter into the group head.
• Press and hold the 1 CUP button and run a short flow of water to rinse out any residual coffee.
CLEANING THE DRIP TRAY & STORAGE TRAY
• The drip tray should be removed, emptied, and cleaned at regular intervals, particularly when the drip tray full indicator is showing EMPTY ME!
• Remove the grid from the drip tray. Lift the coffee grind separator and dispose of any coffee grounds. The EMPTY ME! indicator can also be removed from the drip tray by pulling upwards to release the side latches. Wash all parts in warm soapy water with a soft cloth. Rinse and dry thoroughly.
• The storage tray (located behind the drip tray) can be removed and cleaned with a soft, damp cloth. Do not use abrasive cleansers, pads or cloths which can scratch the surface.
All parts should be cleaned by hand using warm water and a gentle dish washing liquid.
Do not use abrasive cleansers, pads or cloths which can scratch the surface. Do not clean any of the parts or accessories in the dishwasher.
CLEANING THE OUTER HOUSING & CUP WARMING TRAY
• The outer housing and cup warming tray can be cleaned with a soft, damp cloth. Polish with a soft, dry cloth. Do not use abrasive cleansers, pads or cloths which can scratch the surface.
STORING YOUR MACHINE
• Before storing, press the POWER button to off, turn the steam dial to STANDBY switch Off at the power outlet and unplug. Remove unused beans from the hopper, clean the grinder, empty the water tank and the drip tray.
• Ensure the machine is cool, clean, and dry. Insert all accessories into position or into the storage tray. Store upright. Do not place anything on top.
To prevent damage, do not use alkaline cleaning agents when cleaning. Use a soft cloth and a mild detergent.
Do not immerse power cord, power plug or appliance in water or any other liquid. The water tank should never be removed or completely emptied during decalcifying.
USING THE ALLEN KEY
Over time, the silicone seal surrounding the shower screen will need to be replaced to ensure optimum brewing performance.
1. Press the POWER button to switch the machine off and unplug the cord from the power outlet.
2. Carefully remove the water tank and drip tray, taking particular care if they are full.
3. Using a skewer or similar, clean the center of the screw of any residual coffee.
4. Insert the shorter end of the Allen Key into the center of the screw. Turn counterclockwise to loosen the screw.

5. Once loosened, carefully remove, and retain the screw and stainless-steel shower screen. Make note of the side of the shower screen that is facing downwards. This will make re-assembly easier. Wash the shower screen in warm soapy water, then dry thoroughly.
6. Remove the silicone seal with your fingers or a pair of long-nose pliers. Insert the new seal, flat side first, so the ribbed side is facing you.
7. Re-insert the shower screen, then the screw. With your fingers, turn the screw clockwise for 2-3 revolutions then insert the Allen Key to tighten until the screw is flush with the shower screen.
8. Re-insert the drip tray and water tank.
Troubleshooting coffee Machines Barista Express Impress.
| PROBLEM | POSSIBLE CAUSES | WHAT TO DO |
| The machine is on but ceases to operate | • Machine is too hot. | Turn machine off. Wait for 30-60 minutes and turn machine back on. If problem persists, call Breville Consumer Support. |
| Water does not flow from the group head | • Machine has not reached operating temperature. • Water tank is empty • Water tank is not fully inserted and locked into position. | Allow time for the machine to reach operating temperature. Fill water tank. Push water tank in fully and lock latch closed |
| No hot water | • Water tank is empty | Fill water tank. |
| Grinder time out | • The coffee grind is very fine. | Clean out grinder using provided cleaning tool. Refer to page 26 ‘Cleaning Conical Burrs’. |
| Grinding for a very long time | • Chute is blocked. | Clean chute using provided cleaning brush. Refer to page 26 ‘Cleaning Conical Burrs’. |
| Will not grind / grind stops | • Out of beans. • Hopper not locked (dose light flashing back and forth). • Portafilter not fully inserted in the grinding cradle. • Lever is too low and the tamp blocks the chute. • Coffee build-up stopping portafilter insertion. | Add more beans. Lock hopper. Fully insert the portafilter and see the ‘DOSE’ light button illuminates. Raise lever fully to home position. Clean grinding cradle with brush. |
| Pressure Gauge is not working | • Incorrect dose or not enough coffee in the filter basket. • Using coffee beans beyond expiry date. | Use dual wall baskets or use a finer grind size setting. If problem persist, call Breville Consumer Support. Use freshly roasted coffee beans with a ‘Roasted On’ date and consume between 5-20 days after that date. |
| Auto time not adjusting | • Machine in ‘Manual’ mode • In ‘Top-up’ mode. | Press the manual dose dial to return to auto mode. Do not remove the portafilter until grind has completed and ideal dose is reached. |
| Dose level is not updating | • Machine in ‘Manual’ mode. | Press the manual dose dial to return to auto mode. Refer to page 16 ‘Dosing Modes’. |
| Grinder does not grind all beans | • Not enough beans in hopper. | Refill hopper or use manual mode. |
| Severe overdose | • Single basket used in double filter mode | Select the correct filter size. |
| Severe underdose | • Double basket used in single filter mode. | Select the correct filter size for your next dose, then ‘Reset Auto Dose Time’ – refer to page 23. |
| Underdosed | • Grind adjusted to finer grind. | Use ‘A Bit More’ to reach the ideal dose. |
| Coffee is not running from the portafilter | • The coffee grind is too fine. • Water tank is empty | Refer to page 14 ‘Setting the Grind Size’ and refer to page 19 ‘Extraction Guide’. Fill water tank. |
| Coffee runs out too quickly | • The coffee grind is too coarse. | Refer to page 14 ‘Setting the Grind Size’ and refer to page 19 ‘Extraction Guide’. |
| Coffee runs out too slow | • The coffee grind is too fine. | Refer to page 14 ‘Setting the Grind Size’ and refer to page 19 ‘Extraction Guide’. |
| No crema | • Coffee beans are stale. | Use freshly roasted coffee beans with a ‘Roasted On’ date and consume between 5-20 days after that date. |
| Coffee is too cold | • Cups are cold and causing temperature of extraction to reduce. • Milk not heated enough (if making milk-based drink). | Pre-heat cups. When the base of the jug becomes hot to touch this is when the milk is heated at the correct temperature. Refer to pages 20-21 ‘Texturing Milk’ section. |
| No steam | • Steam wand is blocked. • Water tank is empty. | Use the pin on the end of the provided cleaning tool. If steam wand remains blocked, refer to page 27 ‘Cleaning the Steam Wand’ for detailed cleaning process. Fill water tank. |
| Water coming out of steam wand | • Machine is heating up. | Purge steam wand before texturing milk. Refer to pages 20-21 ‘Texturing Milk’. |
| Hot water isn’t continuously flowing | • Machine is too hot after steaming. | Allow machine to cool down. |
| Lever very hard to tamp | • Severe overdose. • Coffee build-up in mechanism. | Use the Razor trimming tool* to correct current dose. Select the correct filter size. Remove shroud (tamp) cover and clean using the cleaning brush provided. |
| Puck surface is not flat and smooth | • Coffee grinds stuck on tamp face. | Remove shroud (tamp) cover and clean using the cleaning brush provided. |
| Puck surface has some loose grounds on top | • Coffee grinds caught on tamp. • Coffee grinds caught on tamp from tamping too quickly. | Push the tamp lever again for a very polished coffee puck. Push the lever down slower. |
| Tamp height is not at desired leve | • Machine is on auto mode, that is for ideal height only. | Use Manual Mode for custom control. |
| Tamp light continues to flash and no height reading on gauge after tamping | • Tamping action is not completed. | Push the tamp lever down until you hear the beep. |
| When maintenance light indicator flashes | • Cleaning cycle is required. | The maintenance light indicator will flash when a cleaning cycle is required. Go to Care & Cleaning section for cleaning and descaling instructions. Go to Care & Cleaning section for cleaning and descaling instructions. |
| When maintenance light indicator illuminates solid | • Descale cycle is required. | The maintenance light indicator is on solid light when a descale cycle is required. Go to Care & Cleaning section for cleaning and descaling instructions. |
Read also
Coffee machine Barista Express Impress. Manual. Review.