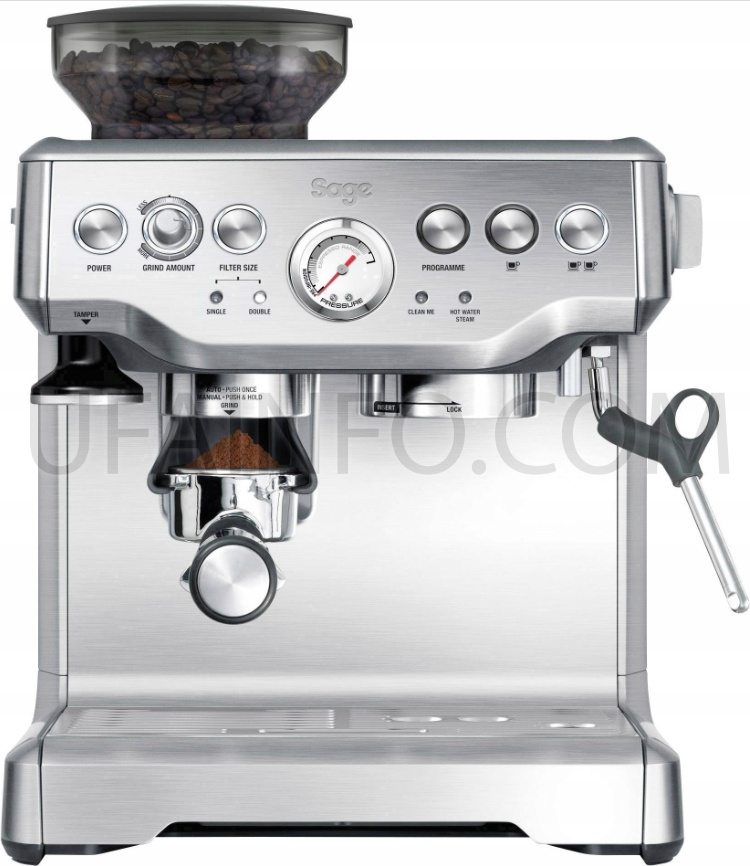
Coffee Machines Barista Express Impress. Part 1
Coffee Machines Barista Express Impress. Part 1
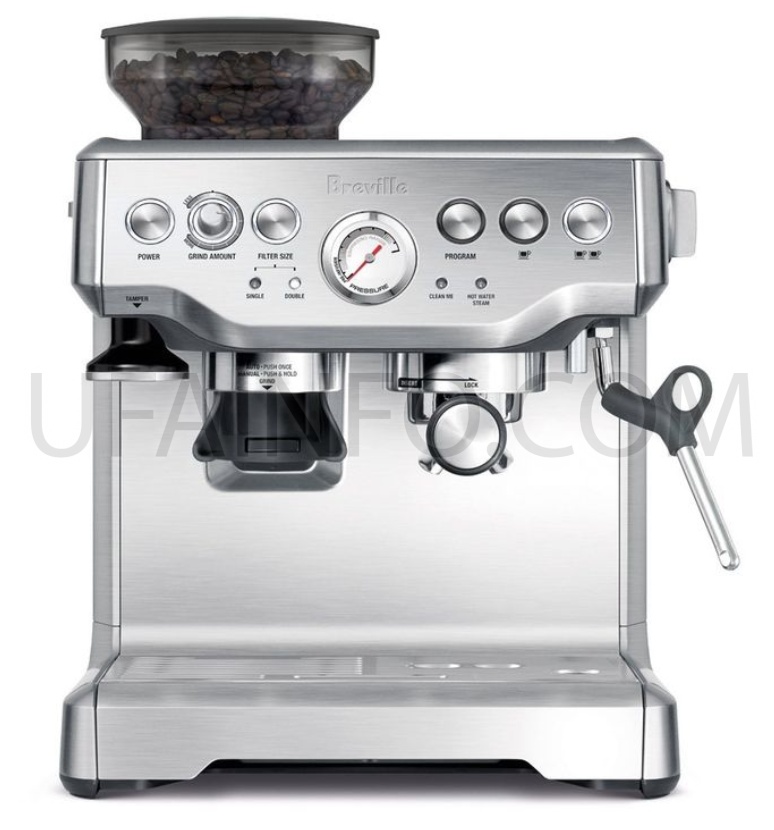
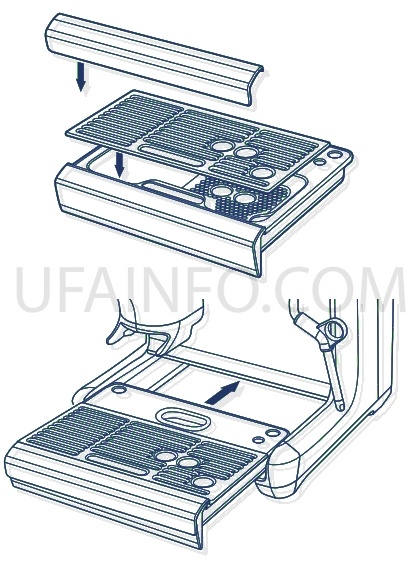
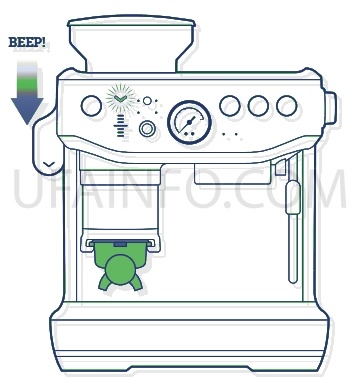
Components coffee Machines Barista Express Impress
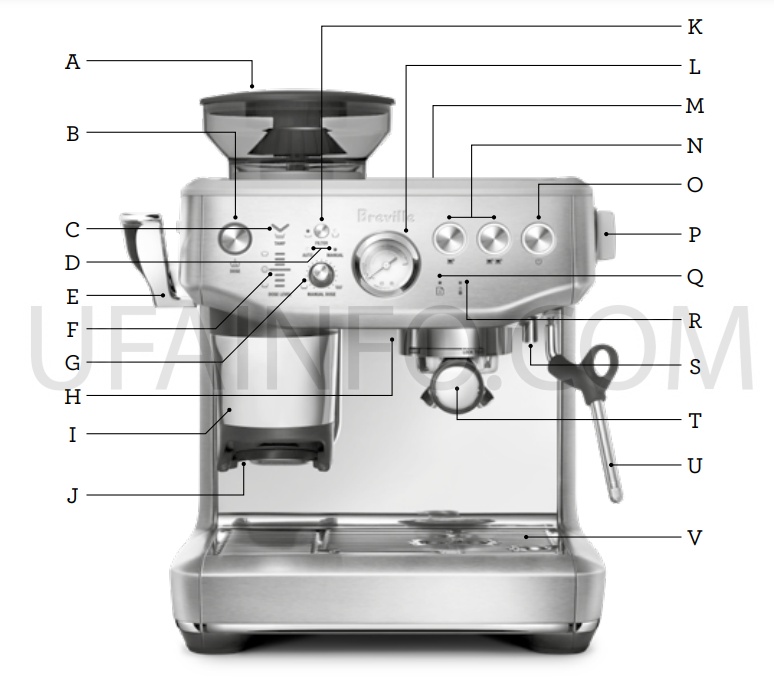
A. 8.8oz (250g) Bean Hopper
B. Dose Button (Grind Start) – Illuminates when portafilter is properly inserted. ‘A Bit More’ – When flashing.
C. Tamp Indicator – Flashes when ready to tamp.
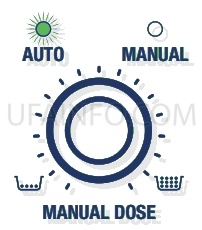
D. Automatic | Manual Dose Light Indicators
E. Assisted Tamp Lever
F. Dose Level Indicator
G. Manual Dose Adjust Dial – Press to change to auto or manual dose mode. Rotate to adjust the manual dose amount.
H. Group Head
I. Removable Tamp Cover
J. Grinding Cradle
K. Filter Button – Single or double filter basket.
L. Espresso Extraction Pressure Gauge – Monitors extraction pressure.
M. 67fl.oz (2L) Removable Water Tank
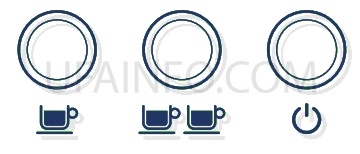
N. 1 CUP, 2 CUP Buttons
O. POWER Button
P. Steam | Hot Water Dial
Q. Maintenance Light Indicator
R. Water | Steam | Heating Light Indicator
S. Hot Water Outlet
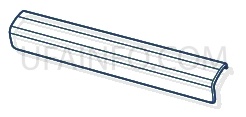
T. 54mm Stainless Steel Portafilter
U. Steam Wand
V. Drip Tray
Rating Information 120 V ~ 60 Hz 1750 W
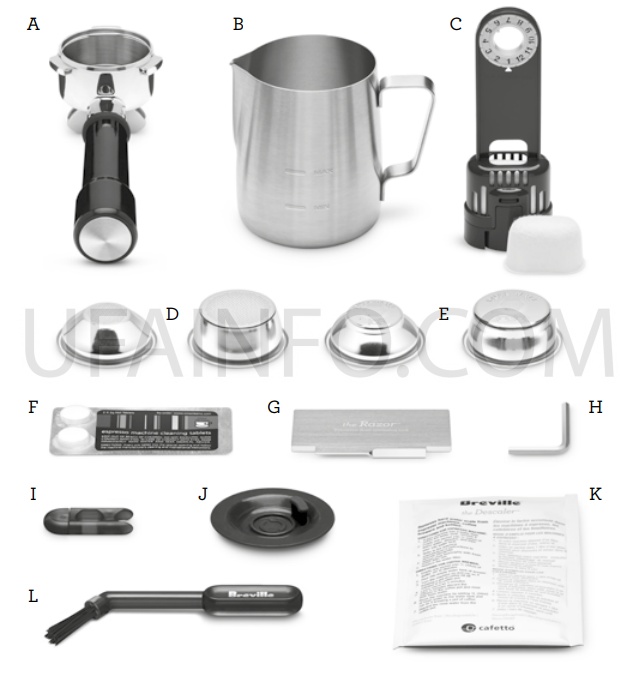
ACCESSORIES coffee Machines Barista Express Impress
A. 54mm Stainless Steel Portafilter
B. Stainless steel milk jug
C. Water filter holder with filter
D. 1 CUP & 2 CUP single wall filter baskets
E. 1 CUP & 2 CUP dual wall filter baskets
F. Cleaning tablets
G. The Razo precision dose trimming tool
H. Allen key I. Cleaning tool for steam wand tip
J. Cleaning disc
K. Descaling powder
L. Cleaning brush
Assembly coffee Machines Barista Express Impress
BEFORE FIRST USE
Machine Preparation
Remove and discard all labels and packaging materials attached to your espresso machine.
Ensure you have removed all parts and accessories from the box before discarding the packaging.
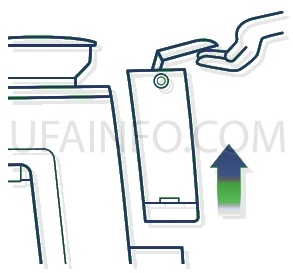
Remove the water tank located at the back of the machine by pulling the water tank handle.
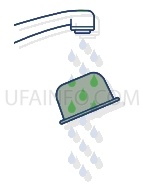
Clean parts and accessories (water tank, portafilter, filter baskets, jug) using warm water and a gentle dish washing liquid. Rinse well then dry thoroughly.
NOTE
For machines in color, drip tray protection guard included. DO NOT DISCARD.
INSTALLING THE WATER FILTER
• Remove the water filter and water filter holder from the plastic bag.
• Soak the filter in cold water for 5 minutes.
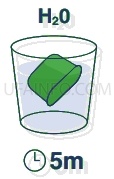
• Rinse the filter with cold water.
• Insert the filter into the filter holder.
• Set the reminder for next month of replacement. It is recommend replacing the filter every 3 months.

REPLACEMENT DUE
• To install the assembled filter holder into the water tank, align the base of the filter holder with the adapter inside the water tank. Push down to lock into place.
Replacing the water filter every three months will reduce the need to descale the machine. Filters can be purchased from the Breville webpage.
Functions coffee Machines Barista Express Impress
Filling the Water Tank
• Ensure the water filter is securely fitted inside the water tank.
• Use the handle at the top of the water tank to assist in lifting the water tank and away from the machine.
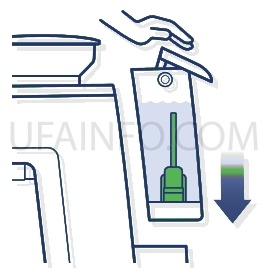
• Fill the water tank with cold potable tap water up to the MAX marking indicated on the side of the water tank.
• Replace the water tank back on the machine, pressing down to ensure that it is properly positioned and attached to the machine.
NOTE
If the water level in the water tank is below the minimum (MIN) marking, the espresso machine will not operate.
Attaching the Hopper
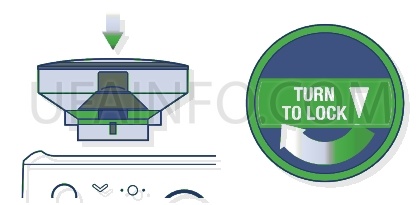
• Insert the bean hopper into position on top of the machine.
• Turn the dial to lock the hopper into place.
• Fill the hopper with fresh beans.
NOTE
The ‘Filter’ light flashes between single and double basket size when the bean hopper is not correctly locked into position.
Attaching the Drip Tray
• Place the drip tray grill on top of the drip tray.
• For machine in color, attach the drip tray protection guard cover on the drip tray.
• Slide the drip tray into the machine.
GENERAL OPERATION
• Check the water tank is filled with cold tap water up to the maximum mark.
• Plug the power cord into the power outlet.
• Press the POWER button. The POWER button will flash while the machine is heating. (Light will flash for up to 55 seconds while the machine is heating.)
When the correct temperature has been reached, the 1 CUP and 2 CUP buttons and the POWER button on the control panel will illuminate.
First Use Priming and Flushing the Machine It is recommended to complete a water flushing operation to ensure the machine has been conditioned.
When the machine has reached STANDBY mode, run the following steps.
• Place a cup under the group head and press the 2 CUP button to run hot water through the group head.
• Place a cup under the hot water spout. Rotate the dial to ‘Hot Water’ position and run water through the hot water outlet for 10 seconds.
• Position the steam wand over the drip tray. Rotate the dial to ‘Steam’ position and activate steam for 10 seconds.
• Discard the contents of the cup.
• Repeat this cycle 3 times. Discard the contents of the drip tray and refill the water tank up to the max line.
• Insert the portafilter into the grinding cradle, press and hold ‘Dose’ button for 3 seconds. Remove the portafilter and discard any grinds.
• Top up the water daily. The water tank should be filled with fresh, cold tap water before each use.
• DO NOT use highly filtered, demineralized, or distilled water in this machine. This may affect the taste of the coffee.
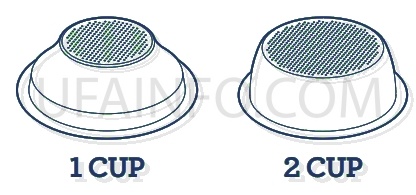
FILTER BASKETS
This machine includes both single and dual wall, 1 CUP and 2 CUP filter baskets.
Use the 1 CUP filter basket when brewing a single cup and the 2 CUP filter baskets when brewing 2 cups or a stronger single cup or mug.
Adjust the grind amount and size if switching from a single basket to a double basket, or vice versa.
The provided filter baskets are designed for:
1 CUP filter basket = 8-11g
2 CUP filter basket = 16-19g
Single Wall Filter Baskets
Single Wall filter baskets should be used when grinding fresh whole coffee beans.
These allows you to experiment with grind and dose to create a more balanced espresso.
Dual Wall Filter Baskets
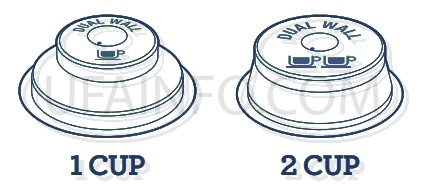
Dual Wall filter baskets should be used when using pre-ground coffee and older beans that are past the 30-day roast date.
These regulate the pressure and helps to optimize the extraction regardless of the grind, dose, or freshness.
THE GRIND
Setting the Grind Size
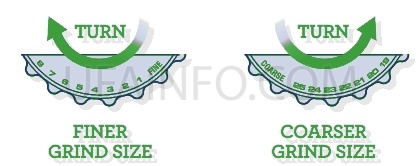
The grind size will affect the rate of water flow through the coffee in the filter basket and the flavor of the espresso. When setting the grind size, it should be fine but not too fine and powdery.
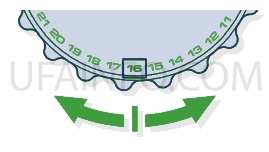
There are 25 settings on the GRIND SIZE dial. To adjust the grind, rotate the dial to the back of the machine to go finer, or rotate the dial towards the front of the machine to go coarser.
The smaller the number, the finer the grind size.
The larger the number, the coarser the grind size. We recommend you start at the No.16 setting and adjust as required.
• When making changes to the grind size, the new auto dosing time will be calculated after your next tamp and updated for the dose cycle following that.
• For most bean varieties, the grinder will automatically switch off when the beans get too low to complete a dose.
Changing the grind size affects the dose in the portafilter. A finer grind size may cause an under dose requiring ‘A Bit More’. A coarser grind size may cause an over dose. To avoid an over dose, press and hold the ‘Filter’ button for 3 seconds, reducing the grind time by 3 seconds.
DOSING
• Ensure the bean hopper is locked on the machine and filled with fresh coffee beans.
• Insert the filter basket required, into the portafilter.
• Press ‘Filter’ size button to select your filter size (single or double).

• Press ‘Dose’ button to start grinding. The light blinks until grind cycle is completed.

If the ‘Dose’ button is not illuminated, check that the portafilter is inserted securely in the cradle, the bean hopper is locked in position and the tamp lever is in the up-home position.
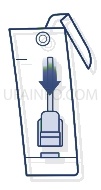
TAMPING
When the grind cycle is completed, the ‘Tamp’ light indicator blinks.
• Push the lever downwards to the end position until a beep sound plays. This will tamp the coffee grinds in the portafilter using a consistent amount of tamp force. Pushing the lever slowly and consistently will help to improve the puck appearance.
• Release the lever slowly upwards to the home position after tamping
It is recommended to tamp twice to achieve a very polished coffee puck. Below is a table of DOSE LEVEL indicator bars:
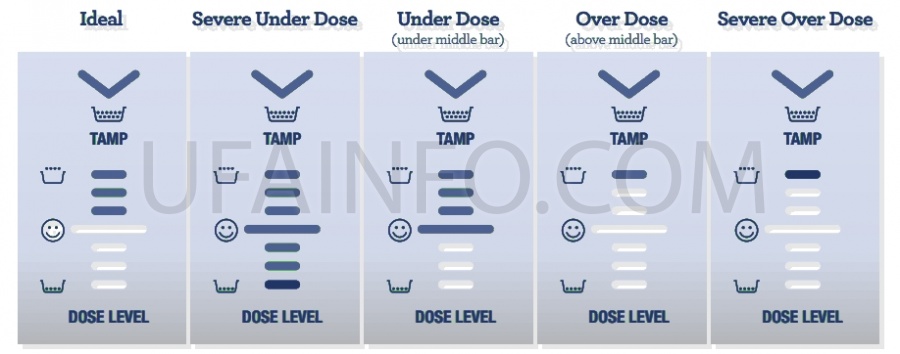
Ideal
Severe Under Dose
Under Dose (under middle bar)
Over Dose (above middle bar)
Severe Over Dose
• The bar on the machine indicates ideal tamp level and the right amount of coffee grind is in the portafilter. This is the level that you are aiming for.
HOW TO CORRECT AN UNDER OR OVER DOSE?
An under or over dose can occur when fresh beans are added to the hopper; when coffee beans age; a different type of coffee bean is used or if a change is made to the grind size.
What to do when dose level is below the ideal middle bar?
• When tamp is below the ideal middle bar, the machine is switched to ‘A Bit More’ mode, the ‘Dose’ button light will flash.

• Press the ‘Dose’ button to add ‘A Bit More’ grinds to the portafilter, then complete a tamp for an updated dose level reading.
• When ideal dose level is reached, the machine will automatically update the auto dose time for the next cycle.
What to do when dose level is above the ideal middle bar?
• When tamp is above the ideal middle bar, remove the portafilter from the cradle.
• Use the Razor Trimming Tool. (refer to Trimming the Dose section)
• The machine will calculate how much to reduce the auto grind time and apply this for the next cycle.
DEDUCT TIME FROM AUTO DOSE
When an over dose is anticipated to occur before grinding, due to; changing to a coarser grind size, changing beans, or running out of beans on previous grind cycle; press and hold the ‘Filter’ button for 3 seconds.
DOSING MODES
Automatic Dosing
This is the default dose function of the machine and the mode that will be most commonly used.
The amount of coffee grinds will automatically dose into the portafilter, and the machine will provide guidance on achieving the ideal amount through the Dose Level Gauge.
The machine will adjust the ideal dose on the next grind.
Under Dose (A Bit More)
After tamping the ‘Dose’ button will flash to indicate more grinds is needed into the portafilter. Press the ‘Dose’ button to add ‘A Bit More’ coffee grinds.
Dose Top-up
This feature is ideal when the portafilter already has coffee but needs more. For example, in situations where:
• Removing the portafilter during grinding and failing to re-insert within 5 seconds time out.
• Removing the portafilter after a full grind cycle without tamping skimming off the top of the coffee pile.
The machine can top up from that amount already in the portafilter basket preventing coffee waste, starting a fresh grind cycle, or updating the auto grind time. To initiate the top up, the portafilter will need to be inserted into the cradle and tamped. If the tamp level displays an under dose, the ‘Dose’ button will blink indicating a top up. Press the ‘Dose’ button to start the grind and it will dose the right amount to get the ideal level.
• This feature is only available on ‘Auto’ mode.
• This feature may require 2 to 3 top up cycles to reach an ideal dose.
• The set auto grind time will not be affected by this feature.
• Machine will not start a top up with an over dose or ideal level.
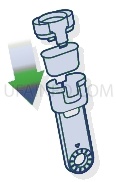
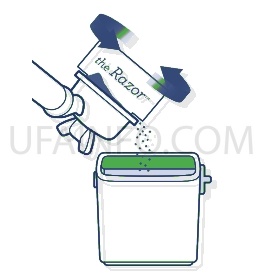
Remove the portafilter and trim the excess with the razor.
Over Dose (Trimming the Dose)

The Razo precision dose trimming tool allows you to trim the puck to the right level for a consistent extraction.
Insert the Razor into the coffee basket until the shoulders of the tool rest on the rim of the filter basket.
The blade of the dosing tool should penetrate the surface of the tamped coffee.
Rotate the Razor dosing tool back and forth while holding the portafilter on an angle over the knock box to trim off excess coffee.
Manual Dosing
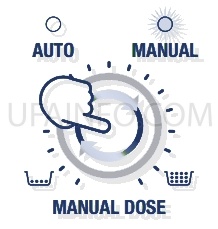
Press the ‘Manual Dose’ button to switch to manual dose mode. The light around the Manual Dose Dial and the Manual light will illuminate when in manual mode. Select the dose amount by turning the dial clockwise for more or counterclockwise for less grind time.
Grinder Purge
It is recommended to purge the retained grinds left in the burrs or chute prior to making the first coffee of the day. Old grinds may affect the in-cup quality and coffee taste. Purging will ensure only fresh coffee makes it into your cup.
To purge, press and hold the ‘Dose’ button. The grind will start after 0.5 seconds, and it will stop once the ‘Dose’ button is released.
In auto mode, after doing a purge it is required to remove the portafilter, discard the grind from the basket and re-insert the portafilter into the grinding cradle to return the machine to its standby mode.
HOW TO MAKE COFFEE
Purging the Group Head
Before placing the portafilter into the group head, run a short flow of water through the group head by pressing the 1 CUP button. This will purge any ground coffee residue from the group head and stabilize the temperature prior to extraction.

Inserting the Portafilter
Wipe excess coffee grinds from the rim of the filter basket to ensure a proper seal is achieved in the group head.
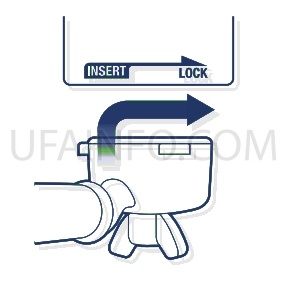
Place the portafilter underneath the group head so that the handle is aligned with the INSERT position. Insert the portafilter into the group head and rotate the handle towards the center until resistance is felt.
Extracting Espresso
• Place pre-warmed cup(s) beneath the portafilter and press the 1 CUP or 2 CUP button for the required volume.

• As a guide, the espresso will start to flow after 8-12 seconds (infusion time) and should be the consistency of dripping honey.
• If the espresso starts to flow before 7 seconds you have either under dosed the filter basket and/or the grind is too coarse. This is an UNDER-EXTRACTED shot.
• If the espresso starts to drip but doesn’t flow after 12 seconds, then you have either over dose the filter basket and/or the grind is too fine.
This is an OVER-EXTRACTED shot.
A great espresso is about achieving the perfect balance between sweetness, acidity, and bitterness.
The flavor of your coffee will depend on many factors, such as the type of coffee beans, degree of roast, freshness, coarseness or fineness of the grind, and the dose of ground coffee.
Experiment by adjusting these factors just one at a time to achieve the taste of your preference.
Read also
Coffee machine Barista Express Impress. Manual. Review.
Coffee machine Minipresso NS Wacaco. Manual. Review.
Coffee machine JURA ENA Micro 9. Manual. Review.
Coffee machine Nespresso Delonghi Lattissima Touch. Manual. Review.