Washing Machine Amana NTW4516FW. Manual. Review. Installation.
Wshing Mchine mn NTW4516FW
INSTLLTION REQUIREMENTS
Tools nd Prts
Gther required tools nd prts before strting instlltion.
Tools needed:
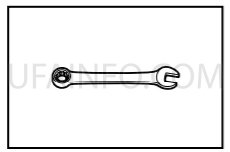
djustble or open end wrench 9 /16" (14 mm)
Level
Wood block
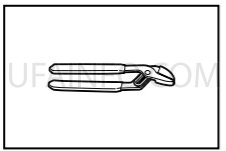
Pliers tht open to 1 3/4" (44.5 mm)
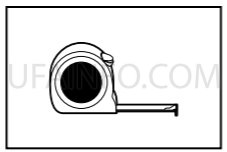
Ruler or mesuring tpe
Optionl tools:
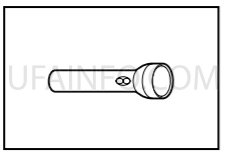
Flshlight
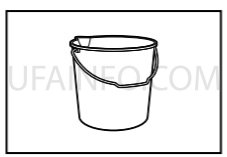
Bucket
Prts supplied:
NOTE: ll prts supplied for instlltion re in crdbord insert in the top of the wsher.
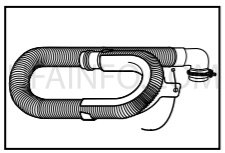
Drin hose with clmp, U-form, nd cble tie
Prts needed: (Not supplied with wsher)
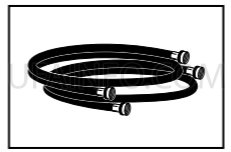
Inlet hoses with flt wshers
To order, plese refer to toll-free phone numbers on bck pge of your Use nd Cre Guide.
n 8212656RP 10 ft. (3.0 m) Inlet hose, Blck EPDM (2 pck)
n 8212641RP 5 ft. (1.5 m) Inlet hose, Blck EPDM (2 pck)
n 8212646RP 4 ft. (1.2 m) Inlet hose, Blck EPDM (2 pck)
n 8212545RP 5 ft. (1.5 m) Inlet hose, Red nd Blue EPDM (2 pck)
n 8212487RP 5 ft. (1.5 m) Nylon brided inlet hose (2 pck)
n 8212638RP 6 ft. (1.8 m) Nylon brided inlet hose, spce sving 90° elbow, hypro-blue steel couplings (2 pck)
n 8212637RP 6 ft. (1.8 m) Inlet hose, Blck EPDM, spce sving 90° elbow, hypro-blue steel couplings (2 pck)
lternte prts: (Not supplied with wsher)
Your instlltion my require dditionl prts. To order, plese refer to toll-free numbers on bck pge of your Use nd Cre Guide.
If you hve: Overhed sewer
You will need: Stndrd 20 gl. (76 L) 39" (990 mm) tll drin tub or utility sink, sump pump nd connectors (vilble from locl plumbing suppliers)
If you hve: 1" (25 mm) stndpipe
You will need: 2" (51 mm) dimeter to 1" (25 mm) dimeter Stndpipe dpter Prt Number 3363920 Connector Kit Prt Number 285835
If you hve: Drin hose too short
You will need: Extension Drin Hose Prt Number 285863 Connector Kit Prt Number 285835
If you hve: Lint clogged drin
You will need: Drin Protector Prt Number 367031 Connector Kit Prt Number 285835
LOCTION REQUIREMENTS
Select proper loction for your wsher to improve performnce nd minimize noise nd possible "wsher wlk".
Instll your wsher in bsement, lundry room, closet, or recessed re.
You will need:
n wter heter set to 120° F (49° C).
n grounded electricl outlet locted within 4 ft (1.2 m) of power cord on bck of wsher.
n Hot nd cold wter fucets locted within 3 ft (0.9 m) of hot nd cold wter fill vlves on wsher, nd wter pressure of 20-100 psi (138-690 kP).
n level floor with mximum slope of 1" (25 mm) under entire wsher. Instlling on crpet is not recommended.
n Floor must support wsher"™s totl weight (with wter nd lod) of 315 lbs (143 kgs).
IMPORTNT: Do not instll, store, or operte wsher where it will be exposed to wether or in tempertures below 32° F (0° C). Wter remining in wsher fter use my cuse dmge in low tempertures. See "Wsher Cre" in your Use nd Cre Guide for winterizing informtion.
Proper instlltion is your responsibility.
Recessed re or closet instlltion
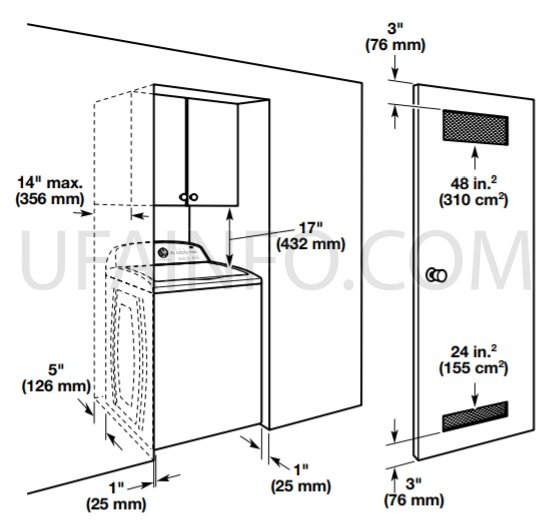
Dimensions show recommended spcing llowed, except for closet door ventiltion openings which re minimum required. This wsher hs been tested for instlltion with spcing of 0" (0 mm) clernce on the sides. Consider llowing more spce for ese of instlltion nd servicing, nd spcing for compnion pplinces nd clernces for wlls, doors, nd floor moldings. dd spcing of 1" (25 mm) on ll sides of wsher to reduce noise trnsfer. If closet door or louvered door is instlled, top nd bottom ir openings in door re required.
DRIN SYSTEM
Drin system cn be instlled using floor drin, wll stndpipe, floor stndpipe, or lundry tub. Select method you need.
Floor stndpipe drin system
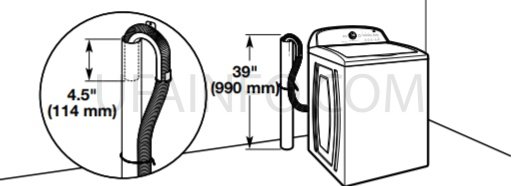
Minimum dimeter for stndpipe drin: 2" (51 mm). Minimum crry-wy cpcity: 17 gl. (64 L) per minute. Top of stndpipe must be t lest 39" (990 mm) high; instll no higher thn 96" (2.44 m) from bottom of wsher. If you must instll higher thn 96" (2.44 m), you will need sump pump system.
It is the responsibility of the instller to instll nd secure the drin hose into the provided plumbing/drin in mnner tht will void the drin hose coming out of or leking from the plumbing/drin.
Wll stndpipe drin system
See requirements for floor stndpipe drin system.
Floor drin system
Floor drin system requires Siphon Brek Kit (Prt Number 285834), 2 Connector Kits (Prt Number 285835), nd n Extension Drin Hose (Prt Number 285863) tht my be purchsed seprtely. To order, plese see toll-free phone numbers in your Use nd Cre Guide. Minimum siphon brek: 28" (710 mm) from bottom of wsher. (dditionl hoses my be needed.)
Lundry tub drin system
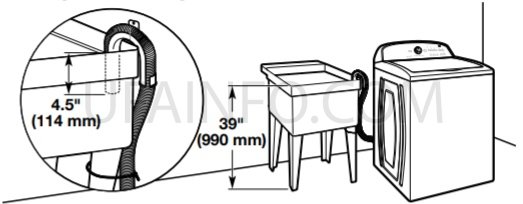
Minimum cpcity: 20 gl. (76 L). Top of lundry tub must be t lest 39" (990 mm) bove floor; instll no higher thn 96" (2.44 m) from bottom of wsher.
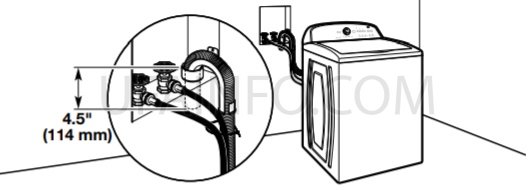
IMPORTNT: To void siphoning, no more thn 4.5" (114 mm) of drin hose should be inside stndpipe or below the top of wsh tub. Secure drin hose with cble tie.
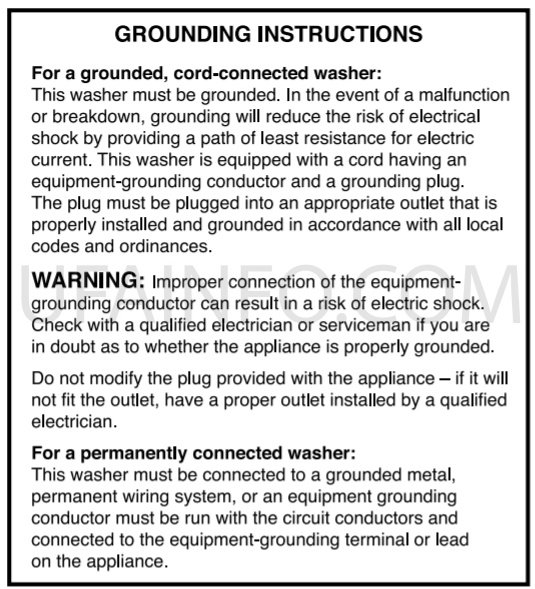
ELECTRICL REQUIREMENTS
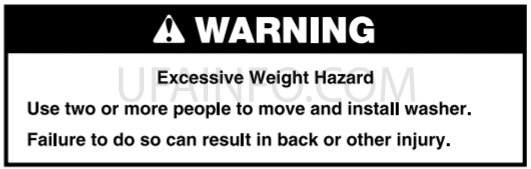
WRNING

n 120 volt, 60 Hz., C only, 15- or 20-mp, fused electricl supply is required. time-dely fuse or circuit breker is recommended. It is recommended tht seprte circuit breker serving only this pplince be provided.
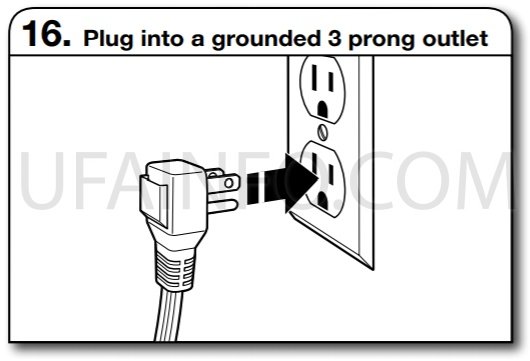
n This wsher is equipped with power supply cord hving 3 prong grounding plug.
n To minimize possible shock hzrd, the cord must be plugged into mting, 3 prong, grounding-type outlet, grounded in ccordnce with locl codes nd ordinnces. If mting outlet is not vilble, it is the personl responsibility nd obligtion of the customer to hve the properly grounded outlet instlled by qulified electricin.
n If codes permit nd seprte ground wire is used, it is recommended tht qulified electricin determine tht the ground pth is dequte.
n Do not ground to gs pipe.
n Check with qulified electricin if you re not sure the wsher is properly grounded.
n Do not hve fuse in the neutrl or ground circuit.
INSTLLTION INSTRUCTIONS
Before you strt: remove shipping mterils
It is necessry to remove ll shipping mterils for proper opertion nd to void excessive noise from wsher.
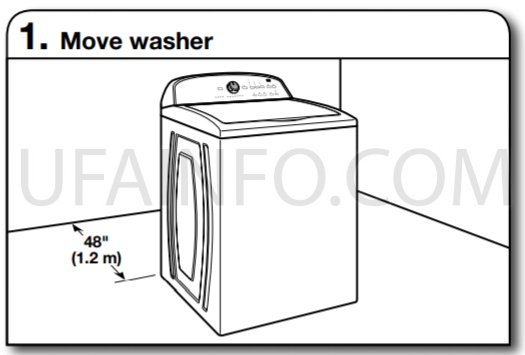
Move wsher to within 4 ft (1.2 m) of its finl loction; it must be in fully upright position.
NOTE: To void floor dmge, set wsher onto crdbord before moving it nd mke sure lid is tped shut.
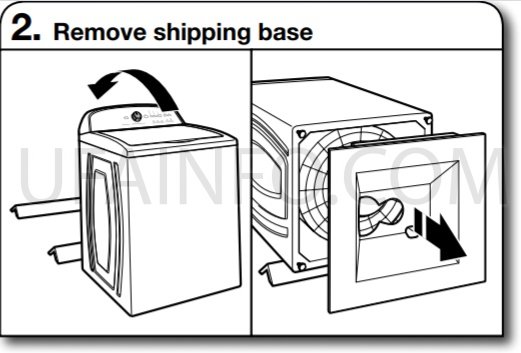
To void dmging floor, plce crdbord supports from shipping crton on floor behind wsher. Tip wsher bck nd plce on crdbord supports. Remove shipping bse. Set wsher upright.
IMPORTNT: Removing shipping bse is necessry for proper opertion. If your wsher includes sound shield, plese refer to the instructions included with the sound shield to instll it t this time.
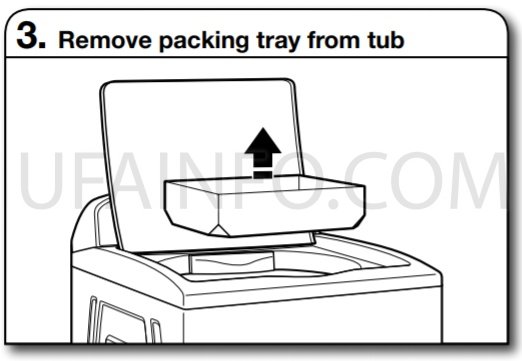
Remove tpe from wsher lid, open lid nd remove crdbord pcking try from tub. Be sure to remove ll prts from try.
NOTE: Keep try in cse you need to move wsher lter.
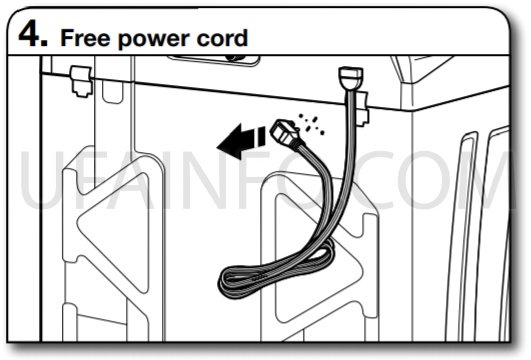
Firmly grsp power cord plug nd pull to free from rer pnel. Gently plce power cord over console to llow free ccess to bck of wsher.
CONNECT DRIN HOSE
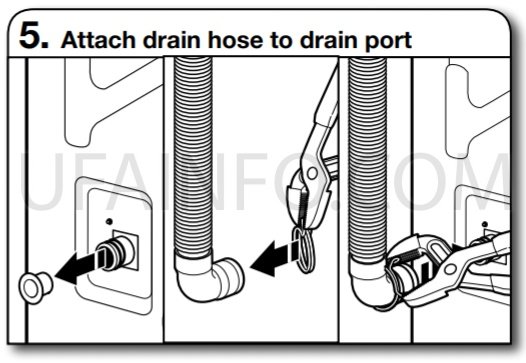
Remove the red plstic plug from the blck drin port on the bck of the wsher.
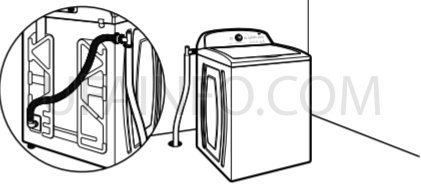
If clmp is not lredy in plce on elbow end of drin hose, slide it over end s shown. Squeeze clmp with pliers nd slide blck elbow end of drin hose onto blck drin port nd secure with clmp. For lundry tub or stndpipe drin, go to step 6.
For floor drin, remove the preinstlled drin hose form s shown in Step 7. You my need dditionl prts with seprte directions. See "Tools nd Prts".
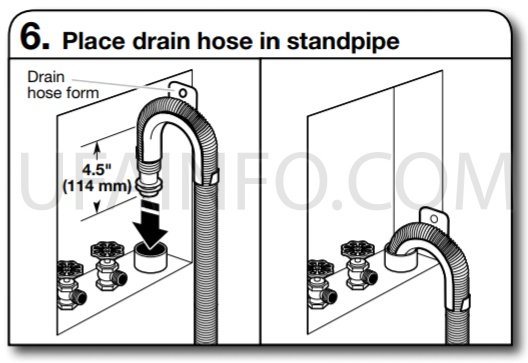
Plce hose into stndpipe (shown in picture) or over side of lundry tub.
IMPORTNT: 4.5" (114 mm) of drin hose should be inside stndpipe; do not force excess hose into stndpipe or ly on bottom of lundry tub. Drin hose form must be used.
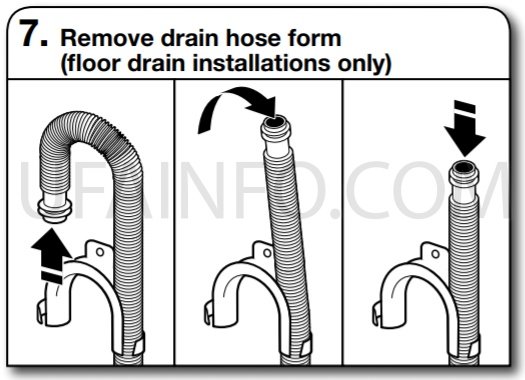
For floor drin instlltions, you will need to remove the drin hose form from the end of the drin hose. You my need dditionl prts with seprte directions. See "Tools nd Prts".
CONNECT INLET HOSES
Wsher must be connected to wter fucets with new inlet hoses with flt wshers (not provided). Do not use old hoses.
NOTE: Both hoses must be ttched nd hve wter flowing to inlet vlves. If you re only connecting to cold wter fucet, you must use Y-dpter (not provided).
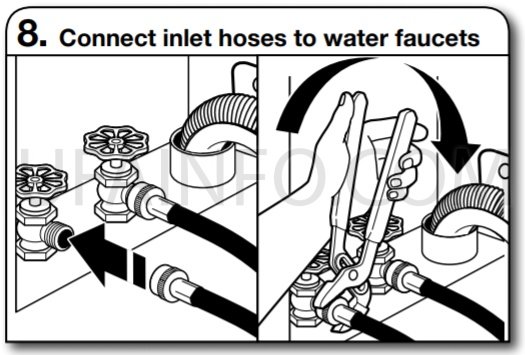
ttch hose to hot wter fucet. Screw on coupling by hnd until it is seted on wsher. Use pliers to tighten couplings n dditionl two-thirds turn. Repet this step with second hose for cold wter fucet.
IMPORTNT: Do not overtighten or use tpe or selnts on vlve when ttching to fucets or wsher. Dmge cn result.
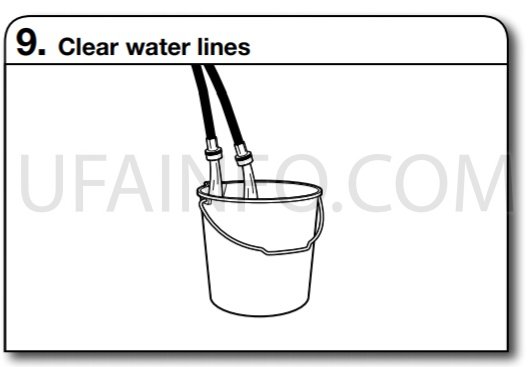
Run wter for few seconds through hoses into lundry tub, drinpipe, or bucket to void clogs. Wter should run until cler.
Mke note of which hose is connected to hot wter to help in ttching hoses to wsher correctly

ttch hot wter hose to hot wter inlet vlve mrked with red ring. Screw coupling by hnd until it is snug. Use pliers to tighten couplings n dditionl two-thirds turn. Repet with cold wter inlet vlve.
IMPORTNT: To reduce risk of hose filure, replce the hoses every 5 yers. Record hose instlltion or replcement dtes for future reference.
n Periodiclly inspect nd replce hoses if bulges, kinks, cuts, wer, or leks re found.
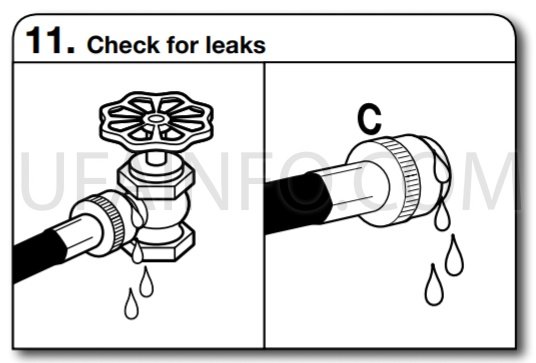
Turn on wter fucets to check for leks. smll mount of wter my enter wsher. It will drin lter.
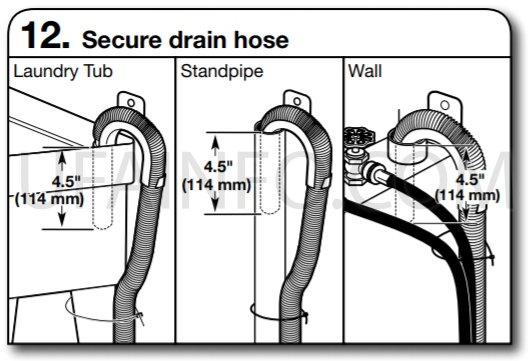
Secure drin hose to lundry tub leg, drin stndpipe, or inlet hoses for wll stndpipe with cble tie.
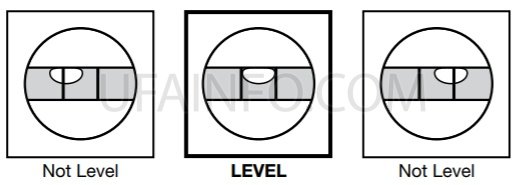
LEVEL WSHER
IMPORTNT: Level wsher properly to reduce excess noise nd vibrtion.

Move the wsher to its finl loction. Plce level on top edges of wsher. Use side sem s guide to check levelness of sides. Check levelness of front using lid, s shown. Rock wsher bck nd forth to mke sure ll four feet mke solid contct with floor. If wsher is level, skip to step 15, (on models with metl feet) or step 16 (on models with plstic feet).
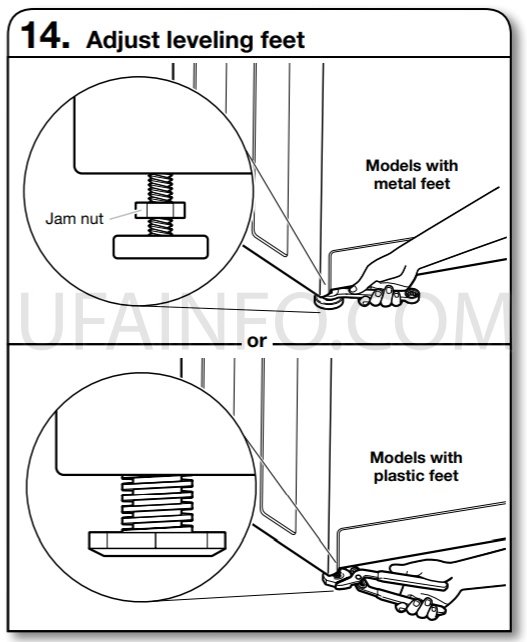
If wsher is not level:
On models with metl feet, use 9/16" or 14 mm open-end or djustble wrench to turn jm nuts clockwise on feet until they re bout 1/2" (13 mm) from the wsher cbinet. Then turn the leveling foot clockwise to lower the wsher or counterclockwise to rise the wsher.
On models with plstic feet, use djustble pliers to turn the plstic leveling foot counterclockwise to lower the wsher or clockwise to rise the wsher. On ll models, recheck levelness of wsher nd repet s needed.
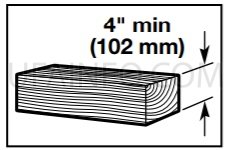
HELPFUL TIP: You my wnt to prop up front of wsher bout 4" (102 mm) with wood block or similr object tht will support weight of wsher.
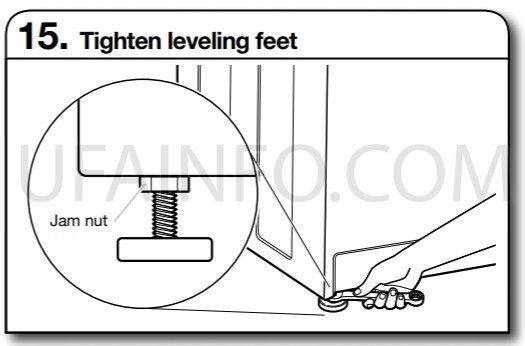
On models with metl feet, when wsher is level, use 9/16" or 14 mm open-end or djustble wrench to turn jm nuts counterclockwise on leveling feet tightly ginst wsher cbinet.
HELPFUL TIP: You my wnt to prop wsher with wooden block.

COMPLETE INSTLLTION CHECKLIST
q Check electricl requirements. Be sure you hve correct electricl supply nd recommended grounding method.
q Check tht ll prts re now instlled. If there is n extr prt, go bck through steps to see wht ws skipped.
q Check tht you hve ll of your tools.
q Check tht shipping mterils were completely removed from wsher.
q Check tht wter fucets re on.
q Check for leks round fucets nd inlet hoses.
q Remove protective film from console nd ny tpe remining on wsher.
q Check tht wsher is plugged into grounded 3 prong outlet.
q Dispose of/recycle ll pckging mterils.
q Red "Wsher Cre" in your Use nd Cre Guide.
q To test nd clen your wsher, mesure 1/2 of norml recommended mount of powdered or liquid detergent nd pour it into wsher bsket or detergent dispenser (on some models). Close lid. Select ny cycle. Strt wsher nd llow to complete full cycle.
W10240509E
W10240510E-SP